Welcome, friend
On this website you can find a bunch of useful tools, both for your personal workstation, as well as for your professional life. This website also serves as my Portfolio, so if you’re looking to hire me, or are interested in filing a development request, don’t hesitate to use the contact section below.
For resources to help you with University subjects, check out my other website
All tools provided on this website are free to use and change, misuse however, is prohibited. Any damage caused by these tools, in addition to violations of local restrictions, are your own problem, not mine.
Who am I?


Welcome to my profile!👋
My name is Leonard Haddad! I’m a 23 years old software developer from Israel currently residing in Germany.
described by colleagues, clients, friends and family as
"a whole IT department - in one person."
⚡"Real-life Tony Stark"⚡
Visitor count


![]()
![]()
![]()
![]()
![]()
![]()
![]()
![]()
![]()
Some of my skills
![]()
![]()
![]()
![]()
![]()
![]()
![]()
![]()
![]()
![]()
![]()
![]()
![]()
![]()
![]()
![]()
![]()
![]()
![]()
![]()
![]()
![]()
![]()
![]()
![]()
![]()
![]()
![]()
![]()
![]()
![]()
![]()
![]()
Github stats

Wanna know if you should hire me or need a software developed? Check out my interactive digital resume below (or here ).
Show Resume
My Resume
This section is included, should you be interested in my capabilities for whatever reason (I’m always open for fun projects, freelance work or similar offers).
The CV is also available as a PDF document here
| Education, Certifications, Trainings | Work Experience | Skills | Projects | Apps | Languages | Programming and Scripting Languages | Operating Systems | Tools I use |
|---|
This is me
This is me.

My name is Leonard Haddad. I am 23 years old and I am working on my Computer Science Masters degree at the University of Bremen in Germany.
I come originally from Israel (with both the Israeli and German passports), but am currently residing in Bremen.
Education, Certifications, Trainings
School
Don’t think it interests anyone, but here you go:
- Finished high school with Israeli Bagrut in 2017. Main subjects: Physics, Mathematics, Electronics and English.
Earned Certificates
I’ve successfully attained the following certifications:
- Computer Science Bsc. (View certificate)
Certifications
- TryHackMe Advent of Code 2023 (View certificate)
Trainings
I’ve participated in the following trainings:
- FirstSpirit® Advanced Training (View certificate)
Career Center
I’ve also participated in the following Career Center courses:
- Blockchain - A technology with a wide range of applications (View certificate)
- An introduction to business for engineers (View certificate)
- Agile Work Techniques (View certificate)
Pending
I’m persuing the following certifications:
- Cisco Certified Network Associate (CCNA, eta. 2024)
- Computer Science Msc. (eta. 2024)
- Computer Science Phd. (eta. 2028)
Work Experience


Vacation work at Mercedes Benz Factory (Daimler) Bremen.

Worked at the print shop Defus ha Hoshen Roberto
Skills
Some skills I have (besides flirting and dark humor):
- IT Consulting (6+ years experience)
- Pentesting (3 years experience)
- Scrum Master/Project Management (2 years experience)
- Regex (regular expressions)
- Googling (apparantly a skill)
- Teaching and tutoring
- Team playing, providing help
- (Abstract-) Problem solving
- Finding help when needed and getting projects done
Projects
A couple projects I worked on:
- Project Deep Anatomy (in collab with Fraunhofer Mevis ) (Master’s project, Python, TensorFlow).
- B-Human (in collab with DFKI ) Framework (Bachelor’s thesis, C++). See my publication for more infos.
- Projekt SEE (Bachelor’s project).
- Hotel management system (Freelance, JavaEE with an H2 Database using Wildfly as the application server): A hotel management software which keeps track of what guests are located in what rooms, where their luggage is, when they are leaving (and where they are leaving to) and a couple other features. Closed source for my client’s privacy.
- Student grading system (Freelance, JavaFX with Sqlite): A simple app which keeps track of students and their grades. Closed source for my client’s privacy.
- Galaxytrucker - a clone of the game FTL: Faster Than Light (University Project, using LibGDX as the game engine, a client/server architecture with an H2 Database and manual network communication using the Java Sockets API). Source code: Gitlab
- SFB Farbige Zustaende (University Project, JavaEE with an H2 Database using Wildfly as the application server): A system for managing staff, experiment results and sample data. Source code: Gitlab
* Of course there are also the projects from work. These however cannot be mentioned for obvious reasons. Technologies used there: Java, JavaEE, Spring Boot, PostgreSQL, MySQL, FirstSpirit®.
Apps
I’ve published a couple apps on the Google Play Store. Check them out below (the code is mostly terrible, then again it was one of the first things I did):
- Open Source Easy File Transfer (Java, Socket API, desktop version using JavaFX).
- Sharky the Angry Sharkfish (C# and Unity for Android)
- Open-Source Password Generator (Java with the processing library). Source code: Github
- Semester Planer Schedule Generator (Java with Android SDK).
Languages
Spoken
I speak the following languages:
- German (Mother Tongue)
- Arabic (Mother Tongue)
- Hebrew (Fluent)
- English (Fluent)
Learning
I’m learning the following languages for fun:
- Spanish
- French
- Turkish
Programming and Scripting Languages
In-Use
Some of the programming languages I regularly use:
- Java (SE and EE)
- My main language (at work)
- Especially for Enterprise (JavaEE, Spring Boot, FirstSpirit®)
- Python (ML, Flask)
- Mainly in my academic fields
- For free-time projects
- C# (with Unity)
- C, C++
- In academic fields
- for pentesting
- for Arduino
- Haskell (academically)
- PHP (with JobRouter®)
- JavaScript
- SQL. I’ve worked with the following databases:
- MySQL, MariaDB
- PostgreSQL
- SQLite
- FirstSpirit® XML (Custom scripting syntax)
- HTML
- CSS
- Bash
- Powershell
- Batch
- DuckyScript
- Markdown (as you see)
- LaTeX
- RISC-V Assembly (academically)
- Solidity (check out my proof-of-concept crypto currency “Salvation” )
Learning
Im also learning the following languages:
- Dart
- Kotlin
Operating Systems
I regularly use the following operating systems:
- Windows - on my main machine
- MacOS-X - in my professional life
- Linux (both professionally and on my own machines)
- Ubuntu 18/20.04
- Kali
- Debian
- Mint
- Arch
- Raspbian Buster (both Headless and with GUI)
- HiveOS
- Unifi OS by Ubiquiti
Tools I use
Pieces of software I use in my professional and daily life.
Professionally
Tools I use at work:
- Jetbrains IDEs
- FirstSpirit®
- Docker
- Git (commandline)
- Maven
- Gradle
- Termius
- Postman
- Terminal
- Sublime Text
- Microsoft Teams, Outlook
- Obsidian (Notebook)
- GnuPG
- Tmux
- Nano
- Vim
In my daily life
Tools I generally use (in addition to the abovementioned ones):
- Anaconda
- Visual Studio and Visual Studio Code
- Adobe Creative Cloud
- Photoshop
- After Effects
- Premiere Pro
- Lightroom
- Illustrator
- VEGAS Pro
- Hitfilm Express
- Autodesk Pixlr
- Autodesk AutoCAD
- Blender
- Unity Engine
- Unreal Engine
- VirtualBox
- Pentesting frameworks
- Metasploit
- Hashcat
- John the Ripper
- Dirbuster
- Netcat
- OpenSSH
- Metamask
- Windows Terminal (with Powershell 7 and WSL)
- MS Office Tools
Ok, so what's on the menu?
Well you can stick around and take a look at the list below, or you can go browse the repository!
Java
Easy File Transfer Tool (Cross-Platform)
Click to view Details
Simple File Transfer PC
Desktop version for the Android app Open Source Easy File Transfer.
This is a companion App for the Python script ptransfer.
For more information, as well as the network protocol used by the application, check out the source code of the Android app on Github.
Licensed in accords with the Apache License 2.0
Author
Created and authored by Leonard Haddad.
Building
To build from source, simply clone this repository and execute
mvn clean verify javafx:run
This requires a valid maven installation with at least JDK 11.
Alternatively, download the latest release from here.
Operating Systems
This App is written with cross-platform support. It runs on any operating system with Java 11.
Preview

Python
 File Transfer Tool
Click to view Details
Python File Transfer Tool
This is a super duper mega simple file transfer tool which may be used to transfer files between two different systems on the same network.
(*) Note: The file is sent in an unencrypted manner.
Usage
The script can be ran in either send or receive mode, with either the sender or the receiver acting as the host.
It can either be ran with all arguments given when running the command, or by merely supplying the ip address and setting the remaining variables through prompts.
Syntax:
ptransfer <IP Address> [[s]end/[r]eceive] [reversed (T/F)] [filepath] [port]
- IP Address: The Interface to listen on/connect to.
- Mode (Optional): [s]end or [r]eceive.
- Reversed (Optional): [f]alse or [t]rue. Usually the sender acts as the server, but this can be reversed on machines where opening a port is disallowed.
- Filepath (Optional): Path to the file to send.
- Port (Optional): Port to connect to/listen on.
Note: While the arguments are optional, it is mandatory to include them in a row (script does not use getopt!). If the port is supplied, then all arguments preceeding it need to be supplied as well!
Running without arguments:
#> ptransfer 127.0.0.1
Please select type send/receive
#> r
Would you like to run in reverse connection mode (sender connects to receiver)?
- True: Receiver must start script FIRST.
- False (default): Sender must start script FIRST.
(*) Note: Android and Java variants dont support reverse mode!
(True/False) #> f
Function
The file is read in and sent in chunks of up to 2 MB of data per cycle (speeds may be slower based on network performance). After the file is completely sent, the hash of the original file on the server’s end is computed and then sent to the receiving end to compare to the hash of the received file in order to insure data integrity. If the hashes do not match, you will be prompted whether or not you want to keep the local file.
List of available Distros
This script has a Java GUI-Equivalent, as well as an Android app. Here is a list of available distros:
Author
Leonard Haddad
Provided in accords with the MIT License
Network Protocol
The script uses a proprietary protocol through TCP. The exchanged messages are displayed below. In hindsight, it would’ve been smarter to use JSON for information exchange (or refrain from using sockets in the first place in favour of TLS), perhaps it will get updated in the future, stay tuned!
Before doing a transfer, the server allows pings to be received to support the scan feature of mobile and java clients. Here is the initial protocol step (A is the sender/server, B the receiver/client):
\[B\rightarrow A:\text{PING}\] \[A\rightarrow B:\text{REPLY}\]If B sends a ping, it receives a reply from the server, otherwise (if it sends init) the following messages are exchanged:
\[B\rightarrow A:\text{"init"}\] \[A\rightarrow B:\text{File name}\] \[B\rightarrow A:\text{"Received Name"}\] \[A\rightarrow B:\text{File size}\]At this point the client has the file name and size. Now they proceed to check whether the file already exists, and if so, read the existing n-bytes into a new file, while renaming the existing file into file name_old.ext.
The next message sent to A is either of:
\[B\rightarrow A:\text{"NONEXISTENT"}\]or
\[B\rightarrow A:\text{"SIZE:current size"}\]If the file exists, the server proceeds sending the remaining m-n bytes of the file, otherwise, it sends all m-bytes of the file.
\[A\rightarrow B:\text{"Ready for transfer!"}\] \[B\rightarrow A:\text{"Beginning file transfer..." (printed on client side)}\] \[A\rightarrow B:\text{File data in chunks of 2MB}\](*) The client calculates the received data by himself. After receiving all m-bytes of the file, the client checks the file hash against that of the server.
\[B\rightarrow A:\text{"GIVE ME HASH"}\] \[A\rightarrow B:\text{Original file hash}\]If the hashes dont match, the client prompts for deletion of the data.
With the last message, the connection terminates.
Gmail Permutation Generator
Click to view Details
Gmail Email Permutation Generator
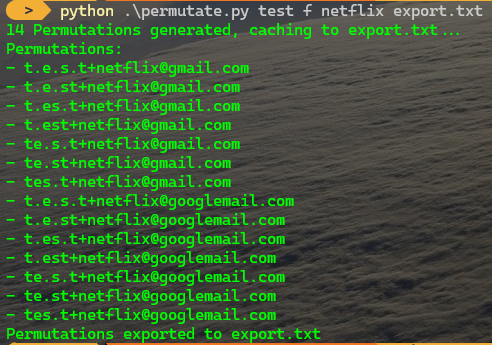
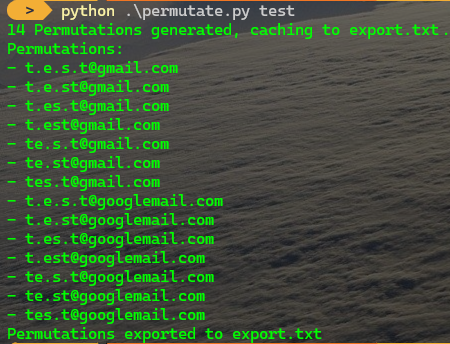
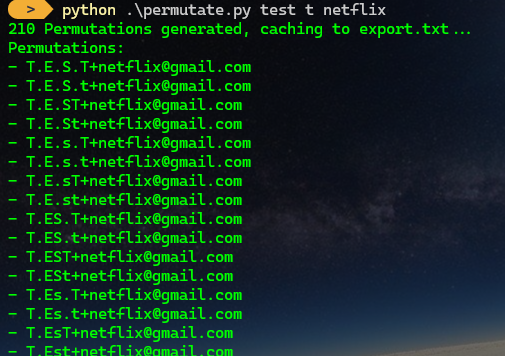
Few people know that Gmail ignores some special characters and allows emails to be permutated in a variety of ways. For example, the below email addresses are all one and the same address:
test@gmail.com
test@googlemail.com
t.ES.t@gmail.com
t.est+netflix@gmail.com
Gmail inherently ignores dots [.] and character cases within email addresses, as well as allowing suffixes to be added to your email (using +) based on the website you’re signing up for:
test+netflix@gmail.com
test+disneyplus@gmail.com
test+instagram@gmail.com
This tool generates these combinations and exports them for you to use.
Usage
Using the tool is pretty straightforward:
python3 ./permutate.py username <charcase - True/False> [optional service name] [optional export file name]
- Username: your Gmail username.
- Charcase: Permutate character case as well?
- Service name (optional): include a service name (such as
+netflix). - Export file name: Where output should be written to.
Demo
No Charcase, service included:
No service:
Service and charcase:
 ONOC Tools
Click to view Details
ONOC Tools
Just a bunch of tools for the annual ONOC.
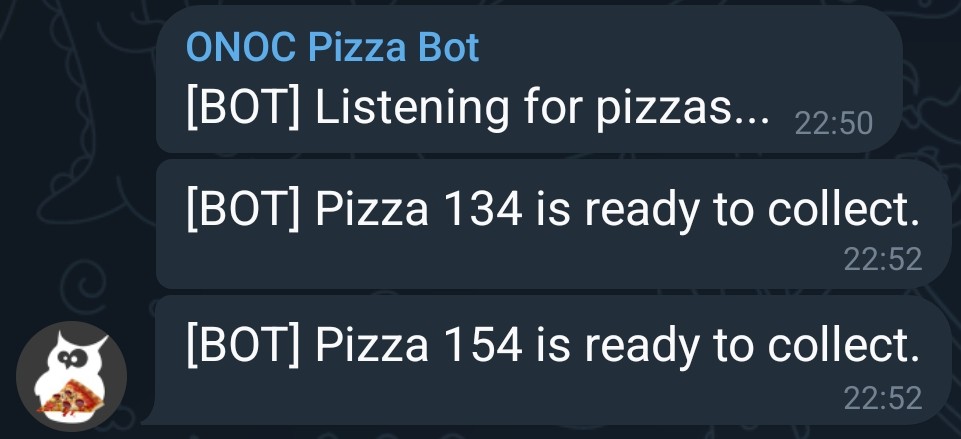
Pizza bot
Bot for notifying you per Telegram when your pizza order has arrived.
Just fill the watched array with your order ids.
Requirements
The following libs are required:
requests
APScheduler
And a Telegram group, as well as a Telegram Bot.
Demo
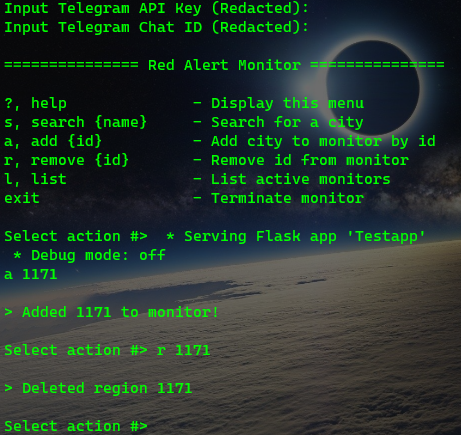
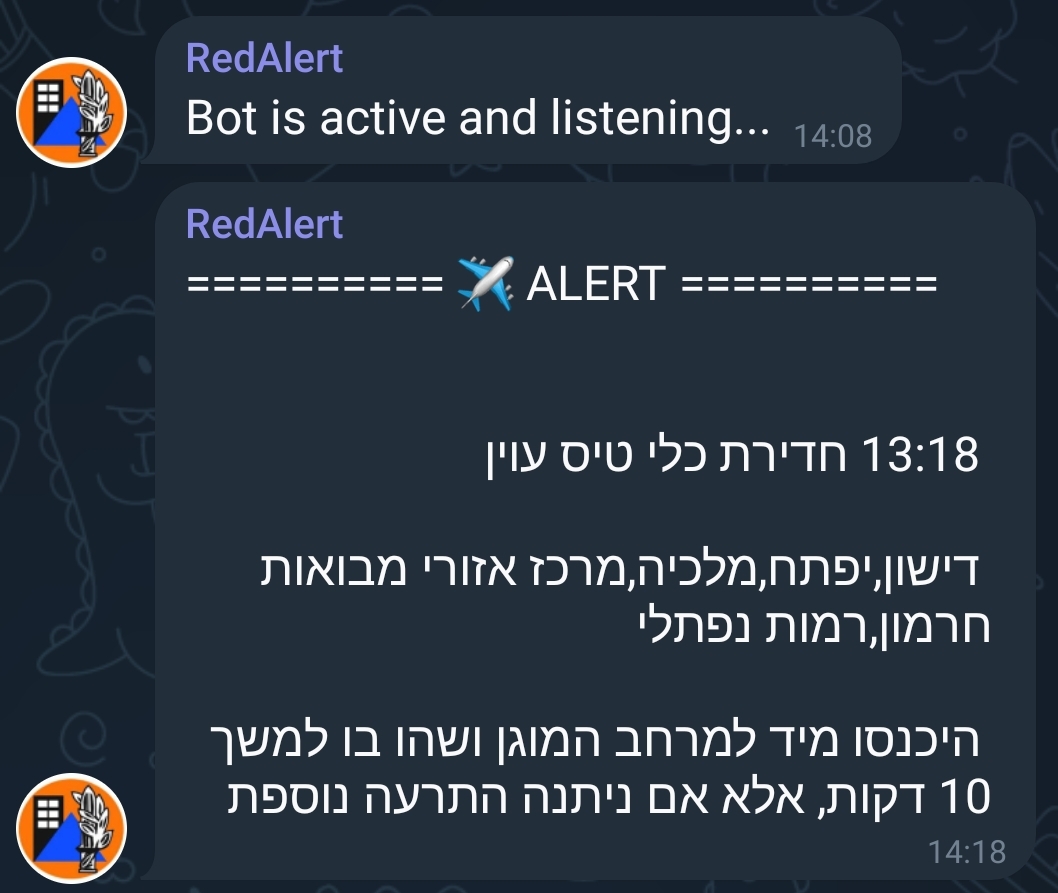
 Israel Red-Alert Telegram Notifier
Click to view Details
Red Alert Telegram Notifier

This python script allows setting up Telegram Notifications for the Israeli Red Alerts issued by Pikud Haeoref during emergencies.
The API is queried every 15 seconds for updates, which are reformatted and sent per Telegram.
(*) The app runs in debug (PoC) mode by default. If you’d like to actually use it, set the DEBUG variable to false. This is done since the app only works from within Israeli territory due to firewall and national security restrictions.
Requirements
This script only requires 2 libraries to run (flask is optional and only used for the test-server):
requests
flask
These can also be installed from the provided requirements.txt file.
Functionality
The application utilizes 2 threads (3 in test-mode, the third one is used by flask):
- UI/CMD Thread: Allows changing which regions are monitored.
- API/Query Thread: Used for making requests to the API every 15 seconds.
The UI Thread allows you to change which regions are monitored through the various integrated commands:
Note: when first running the app, it will attempt to download the JSON file targets.json. Should you not be using Linux, ensure that either curl is available in your Windows Shell, or manually download the file and place it next to this script.
How to run this app
Since the app has a main UI thread, running in in a simple terminal instance is quite annoying. I recommend starting a screen instance, running the app and adding the regions you’d like to monitor and then leaving the screen instance using ctrl+A D.
Credit
Credit where credit is due: This project was inspired by the red-alert-python project. The targets.json file (containing the monitored regions and first downloaded when running the app), is also taken from there.
Demo
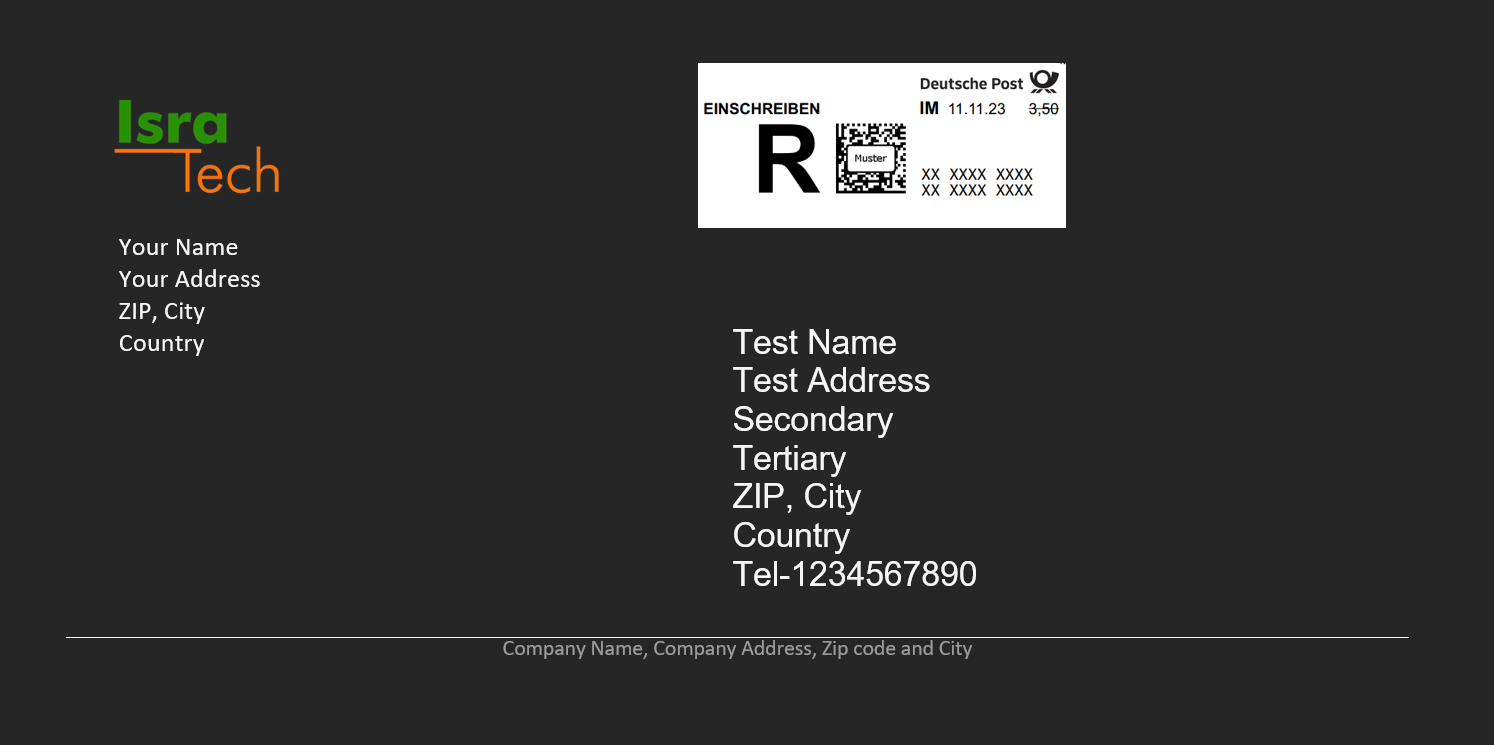
DL Envelope Printable Generator
Click to view Details
DL Envelope Generator
This script allows quickly generating printable DL envelope docx files.
Setup
Libs
First, install the required python modules:
pip install -r requirements.txt
Docx
Then open the .docx file and enter your personal details (And replace the IsraTech logo with your own. If you decide to remove it, change the image in the python script from word/media/image2.png to word/media/image1.png. It would be easier to replace it with a blank image). Do not replace the default stamp or the BLANK entries!
Shell
The script comes with a .cmd script which allows you to generate the stamp in any directory you want. Never execute the script in the default directory, as then the template will be overwritten!
To use this script, add it to a folder within your system’s PATH, and replace the /mypath/to within it to the paths of the docx template and .py script’s.
If done correctly, this allows you to execute envelope within any path to quickly generate printable docx files.
Usage
The script allows you to generate DL envelope templates with and without stamps. To quickly generate a docx template without a stamp, just execute envelope within a path and fill out the details as shown in the screenshot below.
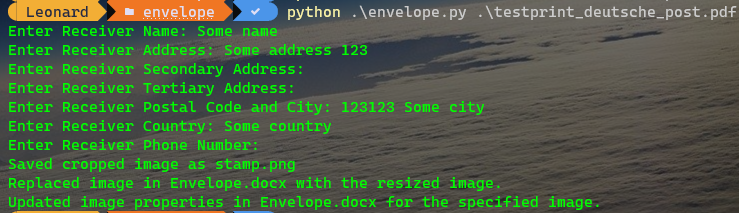
To add a stamp, get yourself a printable PDF stamp from your post office provider with cut-out marks around the corners (see the testprint_deutsche_post.pdf file ) and execute the script with the pdf file as the first argument envelope test_deutsche_post.pdf. This will make you enter the details like in the default mode, but substitute the template file within the docx template with the printable stamp. If you’d like to try this mode, go ahead and do some with the provided stamp.
Now just open the docx file and print it! Viola!
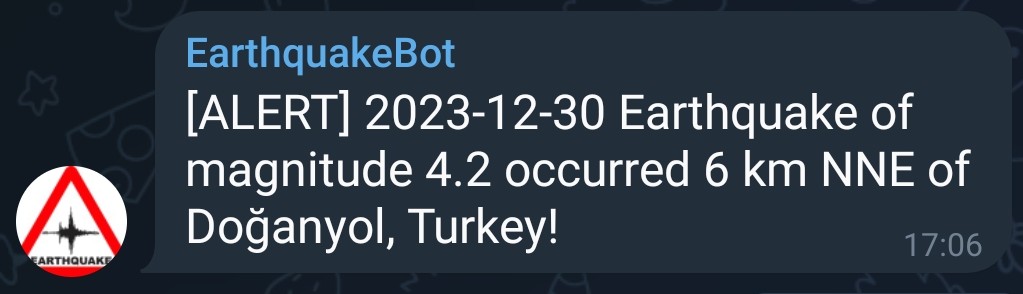
Earthquake Monitor w/ Telegram Notifications
Click to view Details
Simple Earthquake Monitor w/ Telegram Notifications
This module implements a simple application to monitor a country (or city) for earthquakes.
Requirements
The module only requires two libraries
requests
APScheduler
Demo
To run the app, simply start it using python3 ./monitor.py (preferably in a detachable screen), then enter the country, city and telegram credentials.
The app will execute a test-run using the latest earthquake to make sure the Telegram messages are sent correctly, afterwards it will start the listener for future data retrieval. Quakes that have been notified about will get cached. The cache gets cleared every 7 days automatically.
The monitor automatically reaches out to the API every 30 seconds for an update on current quakes, hopefully giving you enough time to find shelter!

Bot Demo
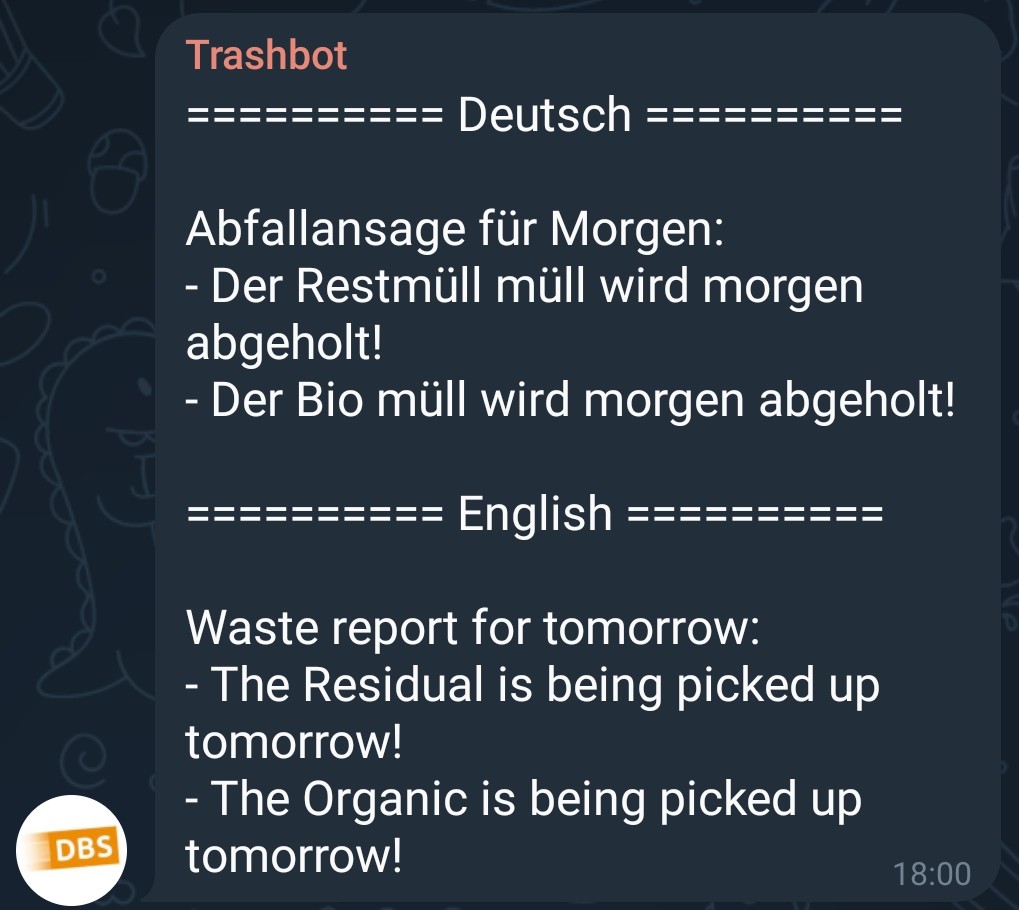
Telegram Trash Schedule Notifier
Click to view Details
Trash Schedule Notifier
This script runs an active scheduler which queries the API of the Bremer Stadtreinigung and looks up the trash schedule for the next day. The script then proceeds to send a telegram message to the given chat-id if the garbage collection is happening on the next day.
The script can best be ran in a screen session on some hosted server. No need to worry about credentials - everything is passed in using the getpass module.
Requirements
The script requires 2 modules:
apscheduler
requests
They can be installed using the provided requirements.txt file.
To allow Telegram notifications, a Bot needs to be created (see how) and the Chat-ID of the chat/group-chat needs to be provided to the script.
Since the contacted API service is quite “primitive”, the street address and house number need to be provided in the correct abbreviations and capitalisations. To check how your address is spelled, check the network logs when accessing the service at https://www.die-bremer-stadtreinigung.de/abfallkalender.
Demo
iCal File Generator
Click to view Details
iCal Event Generator
This simple tool can be used to generate iCal files for quick event importing into other software like Google and Apple Calendar.
Requirements
It requires two python modules, Flask and icalendar
pip3 install icalendar Flask
For using the Google Maps feature, the Google Maps API key for address autocompletion
needs to be inserted at the bottom of templates/index.html after the https://maps.googleapis.com/maps/api/js?key=INSERT_HERE.
The generated iCal file is downloaded to the client system when hitting the Generate button.
Demo

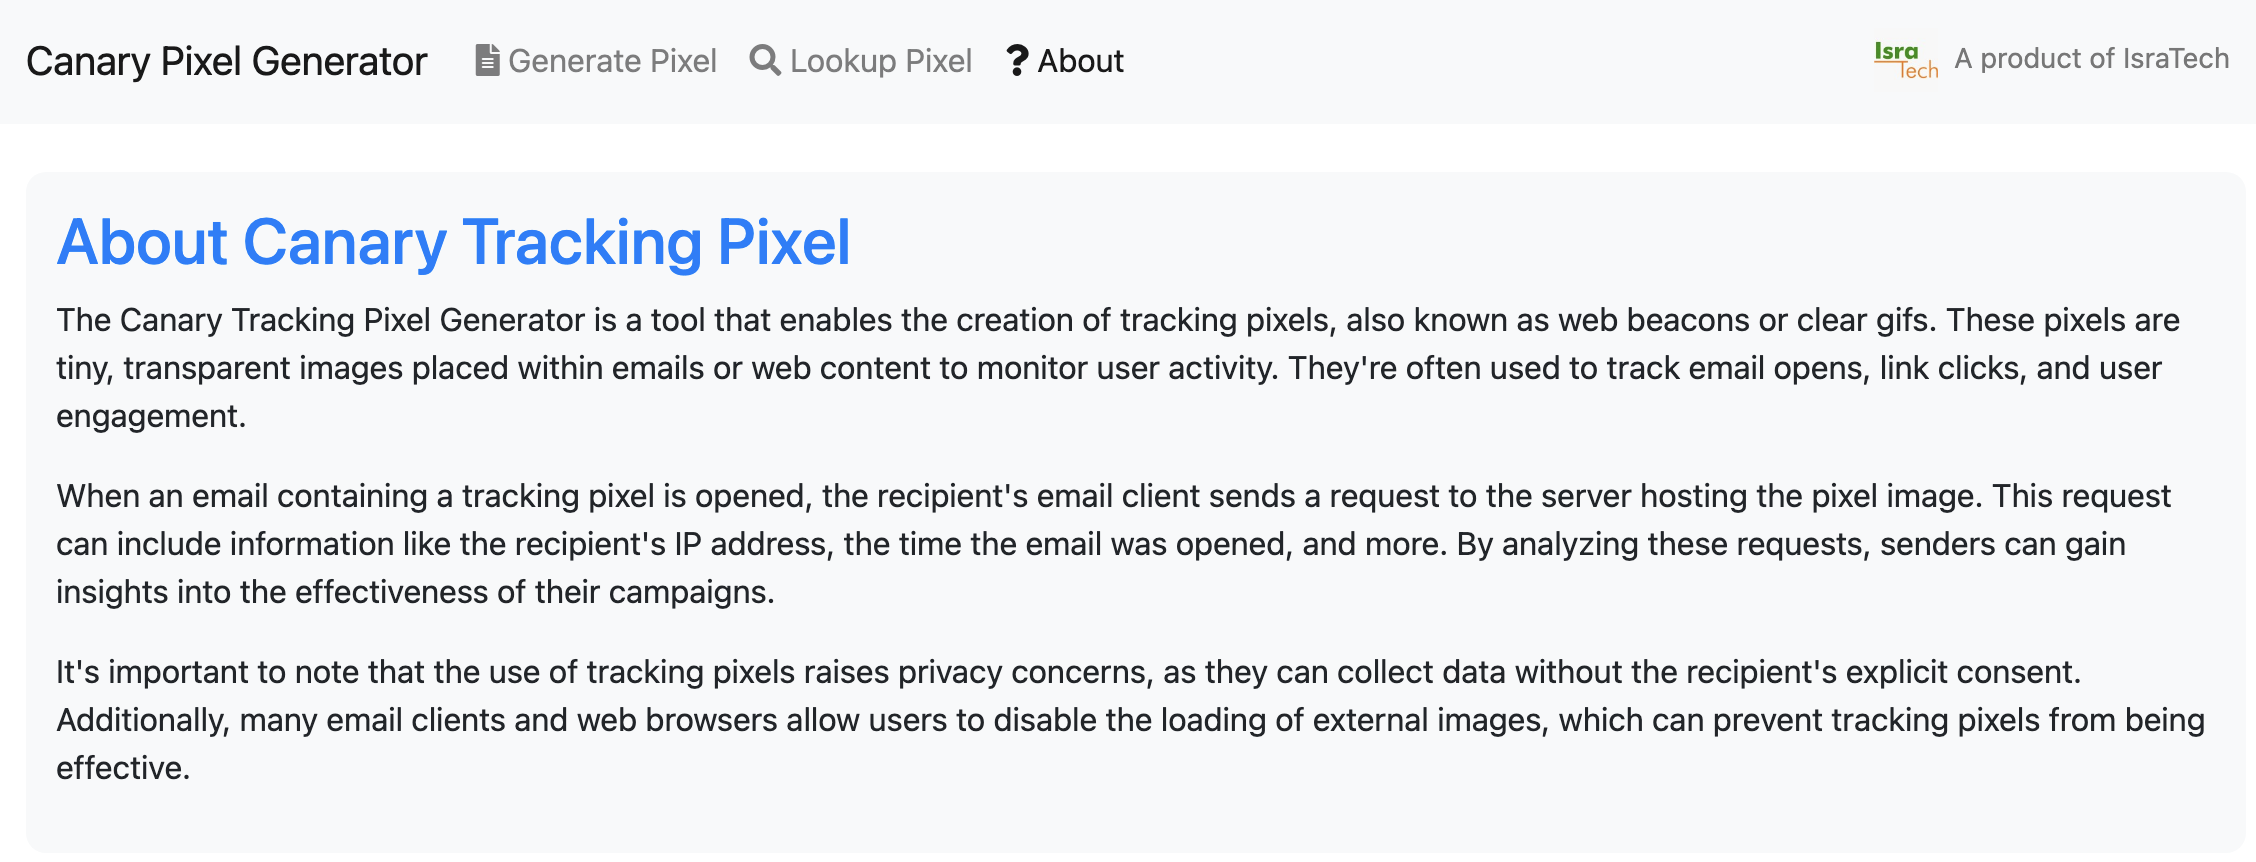
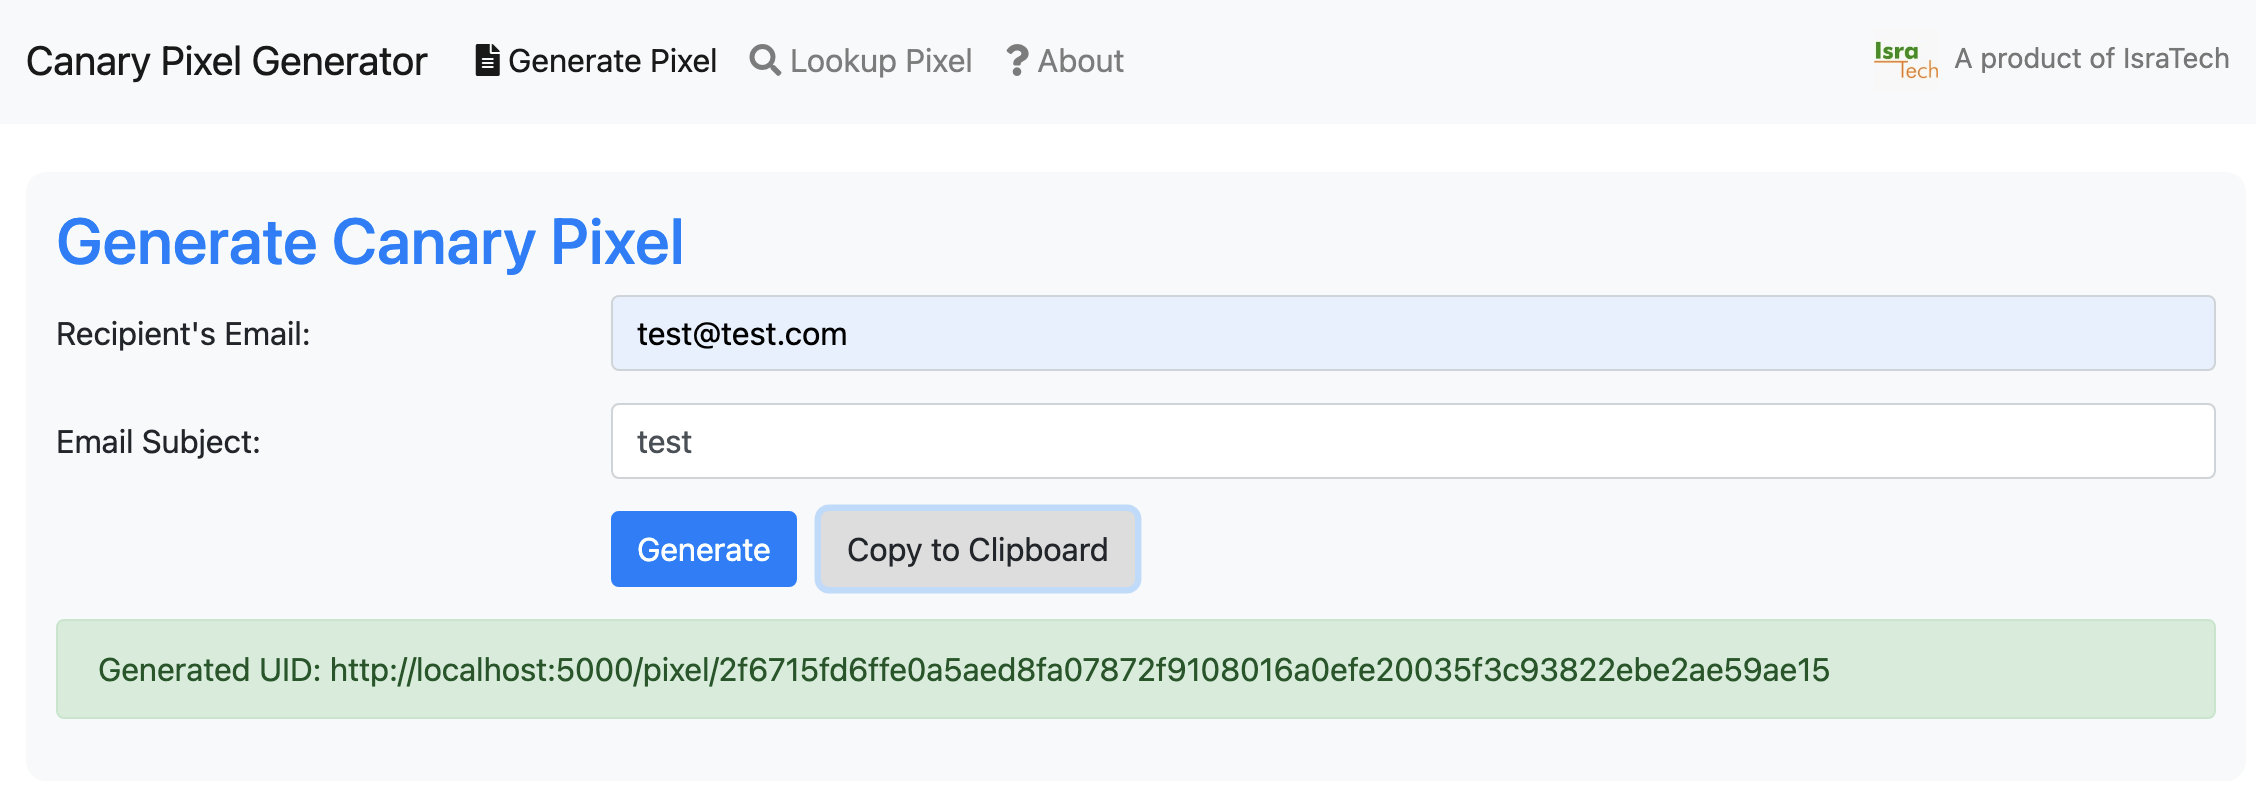
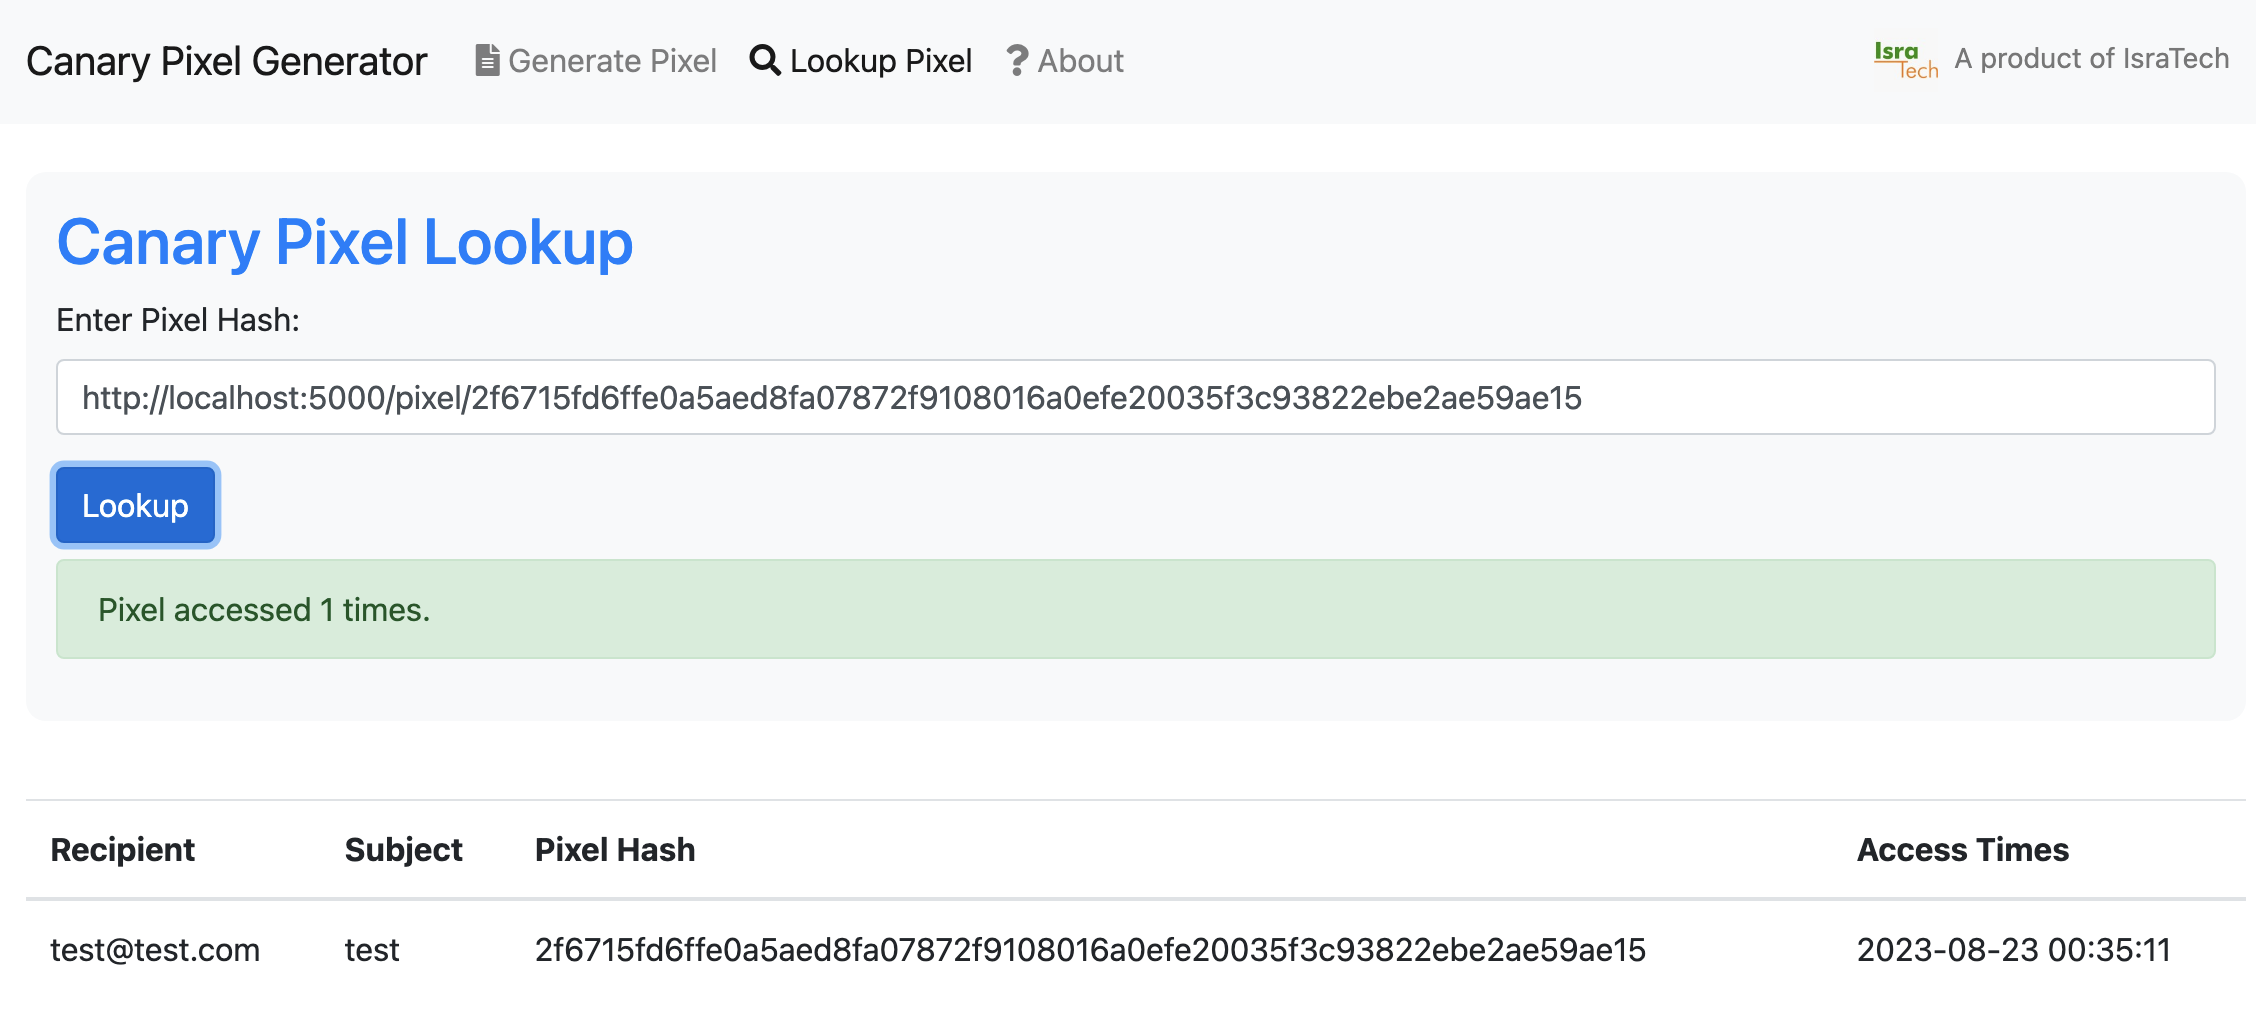
Canary Tracking Pixel
Click to view Details
Canary Tracking Token
This script allows generating canary tracking tokens for emails.
Canary tokens are generated based on the recipient and the email subject. The generation is done in a simple bootstrap interface.
Server logs are stored in a app.log file.
The app can be extended to send messages through Telegram or Discord, instead of writing logs. Use it as you desire.
Requirements
To run the app, Flask and sqlite3 are required. They can be installed using
pip3 install -r requirements.txt
GUI
The GUI is shown below
StudIP REST API
Click to view Details
StudIP REST API
Since StudIP comes with a REST API which is disabled by default, this REST API is used to perform various actions on StudIP using simple HTTP requests.
So far the only feature that has been implemented is an automated course sign up on a given time and date.
Requirements
This app requires the libraries:
- Flask - for running the REST API
- requests - for performing HTTP Requests
- APScheduler - for task scheduling
To run the app simply execute python3 ./flaskapp.py
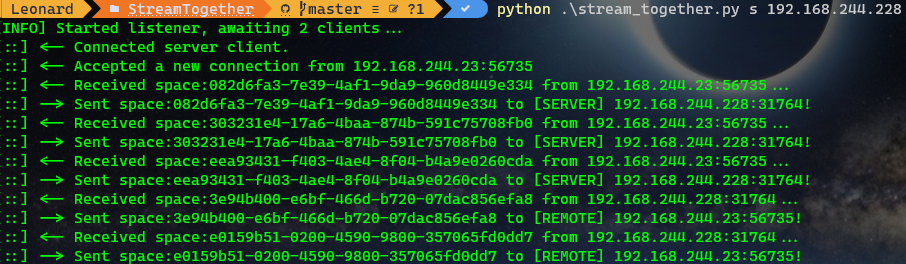
StreamTogether (Synchronous Streaming)
Click to view Details
Stream Together - A DYI Approach
So you’ve come across the scenario where you and your friends want to watch a movie together - each of you on their own machine in their own streaming platform. How do you start the movie synchronously? How do you pause it synchronously for bathroom breaks?
Thats where this module comes in! With StreamTogether you can pause your media - and that of everyone else as well!
Requirements
This module requires two libraries:
pyautogui
keyboard
They can be installed from the requirements.txt file.
Functionality
One of you is going to act as the server. Whoever this is needs to run the script as a server:
python3 ./stream_together.py server [IPv4-/Public IP-Address]
The others will connect as clients:
python3 ./stream_together.py client [IPv4-/Public IP-Address]
Then, just click all of your media players and hit the spacebar to start streaming synchronously! (More keys will be added soon)
Demo
MiniHTTPServer (Minimal HTTP Server)
Click to view Details
MiniHTTPServer
A minimal python HTTP Server (similar to the built in module http.server).
Supports only GET requests and requires no external libraries.
Provided by Leonard Haddad in accords with the MIT License.
Usage
The server runs on port 80 and listens on all interfaces (0.0.0.0) by default.
To change this, execute the script while adding the IP address and ports to listen on.
./server # serves http on http://0.0.0.0:80
./server 8080 # serves http on http://0.0.0.0:8080
./server 127.0.0.1 8080 # serves http on http://127.0.0.1:8080
KeepBusy Mouse Mover
Click to view Details
KeepBusy Mouse Mover
Need your PC to stay active? Just use this simple tool.
To stop, simply use your switch-window shortcut (Alt-Tab on Windows, Ctrl-Tab on MacOS/Linux) and hit Ctrl-C to stop.
Requirements
This tool requires the Python module pyautogui.
Adjusting Speed
To adjust to refresh rates beyond 60Hz, make sure to set the refresh_rate = 144 to your monitor’s refresh rate. This will
ensure the cursor does not move too quickly.
Usage
Run the tool from a commandline window (easiest) or double click the file.
chmod +x ./keepbusy
./keepbusy
The tool will start moving the mouse in a circle pattern.
To stop, hit Ctrl+C.
Adjustments
To make the circle bigger, simply change the r (radius) variable to whatever size you want.
Demo
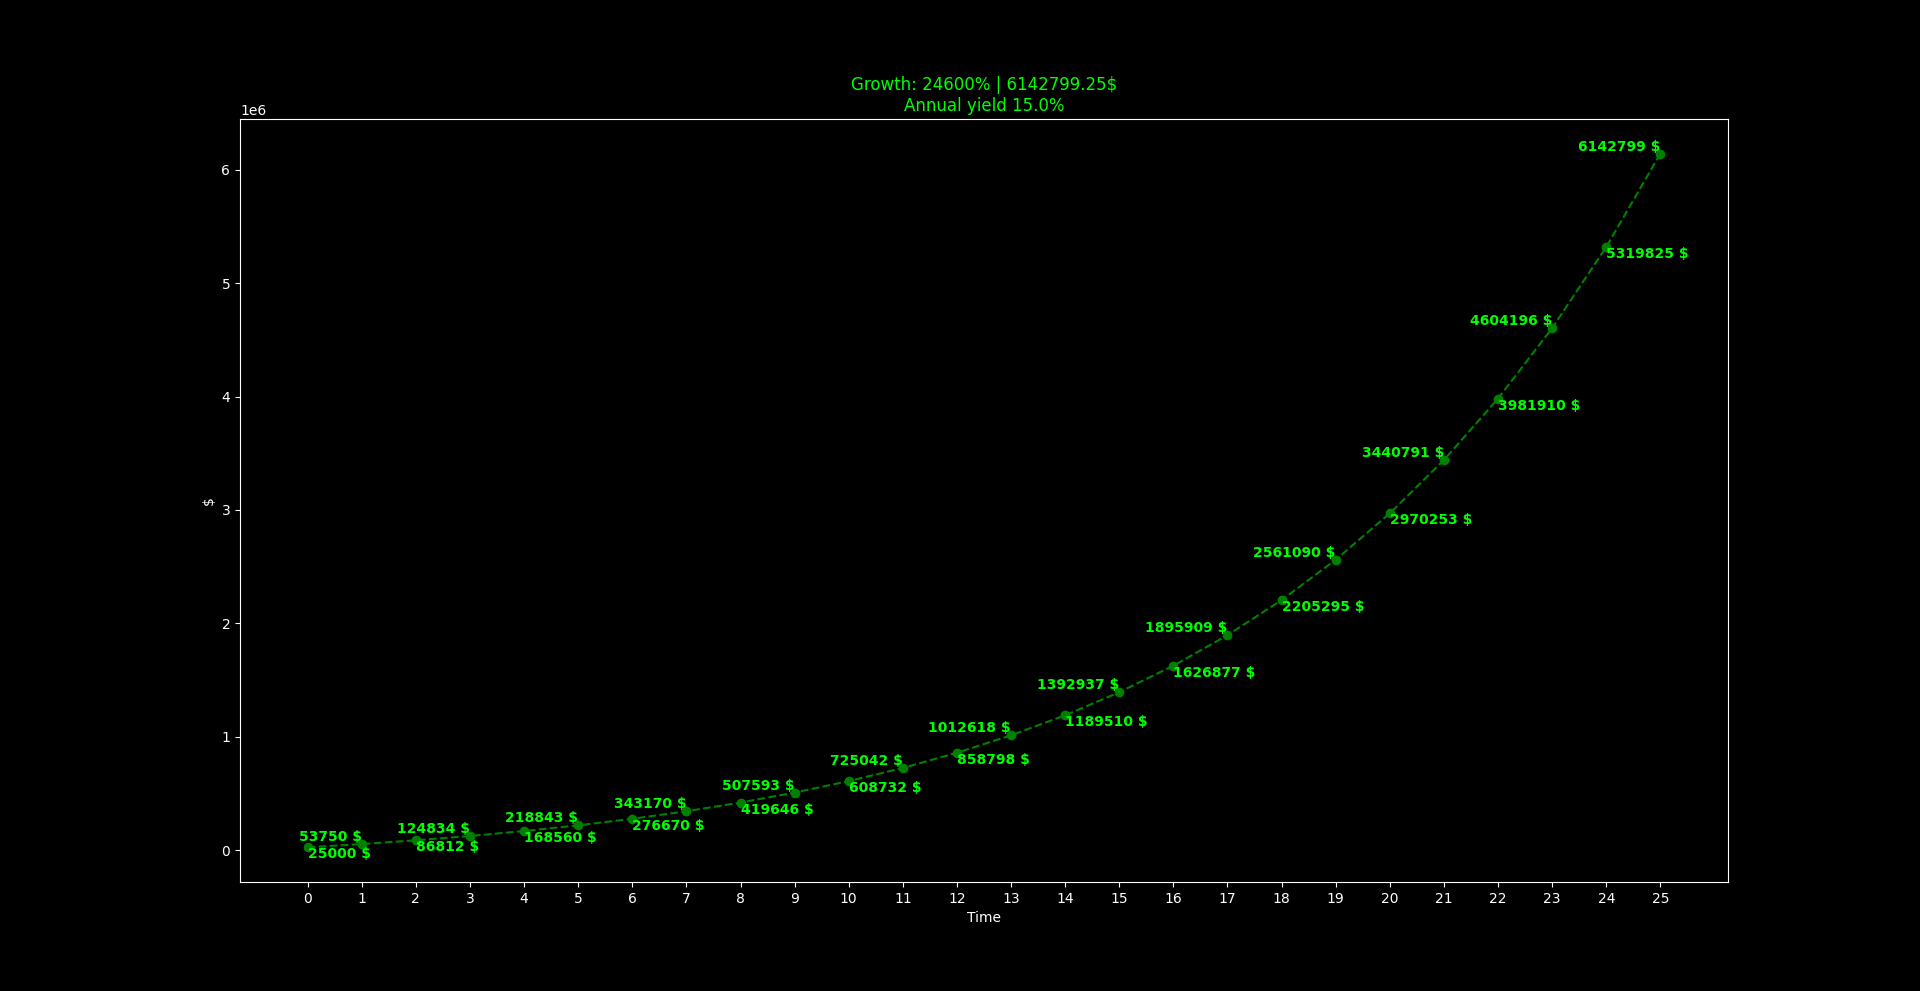
Investment Yield Calculator
Click to view Details
Investment Yield Calculator
Calculates the amount of money one gets for a given annual yield percentage, a certain amount of starting cash and a given timespan. Can also be given an annual investment value so the accumulative wealth is calculated over time.
Requirements
By default, the script does not require any libraries. If you do wish do visualize the annual yield over time, then matplotlib is required.
pip install matplotlib
Usage
Usage (variable in quare braces is optional):
python calc.py <initial $> <Years> <Annual yield as floating point number> [Annual invested money] [graphical - default False]
Example given 25k$ starting cash, 25 years timespan, 15% annual yield and 25k$ invested yearly:
#> python ./calc.py 25000 25 0.15 25000
Yield using 15.0% annual yield and 25000.0$ starting money and an investment of 25000.0$ annually over 25 years is: 6142799.25$
Optional: Graph visualisation
To toggle graph visualisation, add the 5th commandline argument:
#> python ./calc.py 25000 25 0.15 25000 True
Output
Bank-Balance Calculator
Click to view Details
Net Bank-Account Balance Calculator
This tool calculates over a given period of time how much money you will have in your bank account based on your income(s) and expenses.
Prerequisites
Needed libraries:
matplotlib
Usage:
Open the file config.js and set the parameters. These are as follows:
- The array “income” lists a set of income streams
- The “income_change_time” should be set to an amount of months after which your income changes to a new amount. If it doesn’t change, set it to Zero (0).
- The “changed_income” parameter works just like the income parameter, only it is only used after the “income_change_time” has passed.
- The “additional_starting_cash” is money that should be taken into account when starting the calculation, for instance money that people owe you, redeemable credit card points, coupons or similar stuff.
- The “expenses” are your expenses. These have the format {“every_x_months” : [payments_seperated_by_commas]}. An example is a monthly payment of 100$: {“1” : [ 100 ]} where 1 stands for paid 1x per month and 100 is the amount paid. Multiple payments would look like this: {“1” : [50, 100, 30]}.
- The “limited_expenses” are expenses that will stop being paid after a given amount of time, such as loans or similar. The format here is {“months_remaining” : [payments_seperated_by_commas]}. Example: a 50$/month payment plan that has 3 months remaining would be formatted as {“3” : [50]}. Multiple payments would have the format {“3” : [69, 420, 66]}
- The “food” is self explanatory. It lists your food expenses, seperated by commas, similar to the income parameter.
To execute the script, use the following syntax:
python3 calc.py current_bank_balance months_to_calculate config.json
Where:
- “current_bank_balance” is how much you currently have in your account and
- “months_to_calculate” is how many months ahead you want to calculate (BE WARNED that with too many values the plot will be filled to the brim!)
Example
The below example runs a computation over 12 months time with a current bank balance of 696$, an income of 2300$ (consisting of 2 different income streams), a changed income after 5 months (new income is 700$ down from 2300$), 50$ in additional starting cash (let’s assume he got a gift from a friend or something), 700$ in monthly expenses, 50$ in quarterly expenses, 1500$ in semesterly expenses, 400$/month for food and a payment plan for 2 months for 150$/month.
Config.json
{
	"income" : [
			 2000,
			 300
		],
	"income_change_time" : 5,
	"changed_income" : [
			700
		],
	"additional_starting_cash" : [
			50
		],
	"expenses" : {
			"1" : [
					500,
					150,
					50
				],
			"3" : [
					10,
					35,
					5
				],
			"6" : [
					1500
				]
		},
	"limited_expenses" : {
			"2" :  [
					50,
					100
				]
		},
	"food" : [
			400
		]
}
python3 calc.py 696 12 config.json
Output
Password Vault
Click to view Details
Python Password Vault
This small script contains a standalone password vault, secured with Multi-Layer AES-256 Encryption.
The passwords are stored within an unencrypted SQLite Database, the data inside the database is however fully encrypted.
Requirements
The following libraries are required to run the software:
pycryptodome
pyperclip
getpass
hashlib
Functionality
The Password Vault - like any good password manager - can store as many passwords as you wish. These can be modified at any point with the appropriate commands.
- Note: the ID parameter is the Primary Key used in the SQLite database, it can be shown using the –list command *
The following commands are supported by the Password Vault:
--list [username]                 - list all stored password usernames (passwords are hidden)
--display username ID             - display password for a specific username
--copy username ID                - Copy a password to clipboard
--add username password           - add a new password to the database
--edit usr pass newusr newpass ID - edit an existing password
--remove username ID              - remove a password from the database
--changepass                      - change login password
clear or cls                      - clear the screen
--exit                            - exit
NOTE: LOSING THE MASTER PASSWORD MEANS LOSING ACCESS TO THE DATABASE! DO. NOT. LOSE. THE. MASTER. PASSWORD.
Technical Functionality
Disclaimer: I’d like to state first and foremost that I’m no expert in cryptography and this is one of my first cryptographic projects. I did however do my research and take into account the security risks involved in creating such a project.
As such, the database uses AES-CBC to encrypt its data. The database encryption key is encrypted using 2 layers of AES-256 and 3 different salts (each layer unlocks the next) which can be found in the “decryptEverything” function.
To prevent brute-force attacks against the password, the password hash is computed in combination with the 3 abovementioned salts and a bit of AES-256 (completely insane, but does the job). The password is used to decrypt the first salt. The password is then encrypted using the first salt, then concatenated with the first salt to create the decryption key for the second salt. The second salt is then used along with the encrypted second salt as the decryption key for the saved password hash, which is then ran against the hash of the entered password. As mentioned before, insane.
The password hash is then concatenated with the first salt to create a decryption key for the database key, which is finally used to decrypt the actual data in the SQLite database.
Author
Created by: Leonard Haddad
License
This script is provided under the terms of the MIT License. You may modify, share and use the script however you like. I do not take responsibility for any damage caused by the use of this script.
Password Transfer Tool
Click to view Details
Password Transfer Tool (Insecure)
Use this tool to send passwords or sensitive text over LAN.
Usage
The tool can be used with the sender’s IP Address as a CMD argument, or it can be specified through the input field. The password is read from the sender’s clipboard using Pyperclip or using getpass if Pyperclip fails to do so.
./passtransfer [senders_ip_address]
Requirements
The following modules are required:
getpass
pyperclip
Mass Git Diff
Click to view Details
Mass Git Diff
Executes git diff for multiple files simultaneously and generates a greppable changelog file.
Authored by Leonard Haddad, provided in accords with the MIT License.
Usage
- Open the file and set the
committo the hash of whatever commit you’d like to compare to. - Fill the
changed_fileslist with a list of file names that you’d like to check for changes as strings. - Optional: Add your own enumeration at the bottom of the file.
~> ./massgdiff
Output log written to changelog.log
Spotify API Modules
Click to view Details
Spotify API Scripts
Tools:
- Fetch playlist songs
- Create playlist copy
Requirements
- A Spotify API Token
- The following python modules:
requests
Structure
The file config.json contains the necessary Spotify API data. This should be filled accordingly.
The module settings_config is used for handling repeated global functionality. The submodules are named according to their functionalities.
Ethermine Ticker
Click to view Details
Ethermine Ticker
Usage
Set the ADDRESS constant to your ethereum address, the API_TOKEN to your Etherscan API Token and the POLY_API_TOKEN to your Polygonscan API Token.
Get API Tokens:
Etherscan:
https://etherscan.io/apis
Polyscan:
https://polygonscan.com/apis
Output example (number of x’s after the comma is predefined as seen below):
#> ./ethermine_fetch_outstanding_balance.py
===== Ethermine status =====

--- Account Statistics ---
Account Balance: x.xxxx ⧫
Polygon Balance: x.xxxx ⧫
---------------------------
Total Balance: x.xxxx ⧫
Total Balance USD: x.xx $

--- Miner Statistics ---
Current Hashrate: x MH/s
Reported Hashrate: x MH/s
Unpaid Balance: x.xxxxx ⧫
Active Workers: x
Valid Shares: x
Invalid Shares: x
Stale Shares: x

============================
Requirements
The script requires the following modules:
# requests_html - not required unless you want to view the next payout date, currently not working
requests
Please note that getting the requests_html library to work on ARM Chips (for instance Raspberry Pi’s) requires a bit of additional fiddling, check the guide below.
Author
Leonard Haddad
Requests_html on ARM
One-Liners
Chromium installation:
sudo apt install python3-pip libxslt-dev chromium-codecs-ffmpeg-extra chromium-browser -y && pip3 install --upgrade requests && pip3 install --upgrade requests_html
Replacing x86/x64 version of chromium with ARM version:
rm -rf ~/.local/share/pyppeteer/local-chromium/588429/chrome-linux/* && cd ~/.local/share/pyppeteer/local-chromium/588429/chrome-linux/ && ln -s /usr/bin/chromium-browser chrome && cd ~
Detailed Documentation
Install pip3 using
sudo apt install python3-pip -y
Install the required libraries
pip3 install requests && pip3 install requests_html
To get the ARM chromium browser running (used in background by requests_html) execute
sudo apt-get install libxslt-dev chromium-codecs-ffmpeg-extra chromium-browser -y
Now execute the python script, this will download a x86/x64 Version of Chromium, however just let it run. The script will then spit out an error as the browser can’t be run on the ARM Chip, this however is completely fine.
Execute the following to remove the x86/x64 version of chromium and create a symbolic link in its place pointing to the ARM version of chromium
rm -rf ~/.local/share/pyppeteer/local-chromium/588429/chrome-linux/* && cd ~/.local/share/pyppeteer/local-chromium/588429/chrome-linux/ && ln -s /usr/bin/chromium-browser chrome && cd ~
Monoalphabetic Decypherer
Click to view Details
Monoalphabetic Decypherer
Authored By: Leonard Haddad
License
Access is hereby granted in accords with the MIT License. You may modify and change the provided script files however you like. Any damage caused however, will be your own problem.
Usage
The provided decypherer has a wide variety of options.
- To get started, enter the cyphered text (without newline breaks, as these will be read in as commands - python input standards)
After doing so you can enter a custom alphabet and decide whether all the text should be in lowercase or not.
Provided Tools
As mentioned above, the decypherer has a wide variety of options:
- Normal Letter Decypher Mode - Replaces a single manually provided letter with another single manually provided letter
- Brute-Force/Round-Robin Letter Mode - Replaces a single manually provided letter with every letter of the alphabet
- Word-Match Mode (random/specific) - Attemps to replace an entire word with a provided word, replacing all letters in the text with the ones of the provided word. The word that gets replaced is either random or specific based on your decision.
- Letter-Count - Displays letter counts + percentages
- Json-Serialise - Allows export of found matchings to a Json file
- Json-Deserialise - Allows import of matches from a Json file
Usage of these options is explained in the script. To view all available commands, type –help
Reverse Shell
Click to view Details
Python Reverse Shell
BY TESTING AND CHECKING OUT THESE SCRIPTS YOU ARE AWARE OF THE DISCLAIMER BELOW AND AGREE TO THE TERMS OF USAGE.
Version
Python Version 3.7.3
Notes
-
Make sure to change the IP Adress in the Client script, or this WILL NOT WORK!
-
Make sure the host PC has port forwarding enabled. Preferably use port 443 to avoid Firewall.
-
Default Address and Port are 127.0.0.1 and 5050 (127.0.0.1:5050)
Terms and Disclaimer
TERMS OF USAGE:
USAGE OF THESE SCRIPTS IS PERMITTED FOR EDUCATIONAL AND PEN-TESTING USE ONLY ON SYSTEMS THAT YOU HAVE PROPER PERMISSION TO USE. SHALL YOU DECIDE TO ABUSE THESE SCRIPTS FOR MALICIOUS ACTIVITIES, YOU, AND YOU ONLY, WILL BE HELD RESPONSIBLE. YOU ARE RESPONSIBLE FOR YOUR OWN ACTIONS, AND I SHALL, AND WILL NOT BE HELD RESPONSIBLE FOR ANY MISUSE OF THESE SCRIPTS. BY USING THESE SCRIPTS, YOU ARE AGREEING TO THESE TERMS AND THE DISCLAIMER BELOW. YOU HAVE BEEN WARNED!
DISCLAIMER
THE PROVIDED SCRIPTS ARE FOR EDUCATIONAL PURPOSES ONLY. THEY AIM TO EDUCATE THE READER ABOUT SOCKETS AND HOW TO BUILD A CONNECTION BETWEEN THEM, WHILE ALSO ISSUING COMMANDS ON THE OTHER END. THESE SCRIPTS ARE INTENTED FOR THAT AND PEN-TESTING PURPOSES ONLY! MISUSE AND OR ABUSE OF THIS TOOL IS FORBIDDEN AND WILL HAVE LEGAL CONSEQUENCES. I SHALL AND WILL NOT BE HELD RESPONSIBLE FOR ANY MISUSE OF THE PROVIDED SCRIPTS.
Markdown/Text Editor
Click to view Details
Python Markdown Editor
This is a nice little markdown/text editor with built in markdown/html preview and code execution.
This script is inspired by the article How to Build a Toy Markdown Editor with Python and Tkinter By Palash Bauri Link to Article
Provided unter the MIT License
YouTube MP3 Downloader
Click to view Details
Youtube to MP3 Downloader
This tool allows you to simply copy a link of a youtube video to your clipboard, which will automatically start downloading that video to MP3. It can also be used on playlists, where it will then download the entire thing.
Requirements
To use this tools, the following libraries are required:
youtube-dl
ffmpeg
ffprobe
Alternatively to ffprobe, one might use avprobe on Linux.
Using
pip install ffmpeg
on Windows often doesn’t work, thats why the file ffmpeg.encoded ist included. To get the exe, simply execute
certutil -decode ffmpeg.encoded ffmpeg.exe
The SHA-256 checksum for the exe is
55720D404B2476631C82F1EFB636A2244BBEB1E197373D553EA724CA1B2A23FE
then paste the exe in
Python3x/Scripts
and add the folder to PATH.
License
Provided under the MIT License. Please note that local regulations differ from region to region, and usage of this tool may therefor be prohibited! I do not take responsibility for any damages caused by the use of this script.
Author
Author: Leonard Haddad
Powershell TCP Reverse Shell Generator
Click to view Details
Powershell Reverse TCP Payload Generator
By: Leonard Haddad
Usage
[Batchfile]
[Setup]:
- Change path_to_template_file in batchfile to the path containing the template file
- Change path_to_script in batchfile to the path containing the python file
[Usage]:
shellgen.cmd ip_address port
- ip_address - Address that the payload should connect to using reverse connection (attacker IP address)
- port - The port to connect to
[Python]
[Usage]:
shellgen.py export_path template_path ip_address port
- export_path - The path to export the payload.ps1 file to
- template_path - Template file path (including filename and extension)
- ip_address - Attacker IP Address
- port - Attacker port
Disclaimer
- Privilege Escalation Exploit - By lokiuox on Hak5 Forums
- Powershell TCP Reverse Shell - By bascoe10 on Github
Chat Spammer
Click to view Details
Chat Spammer
This tool is only intended for trolling your friends and family.
Use this tool to troll your friends/family by showing them who is the real typing boss!
Requirements
This module requires the modules pyautogui and keyboard (and pyperclip for super speed). Install them using
pip install pyautogui keyboard pyperclip
Usage
To use the tool, simply pass the text you would like to spam as an argument to the script:
python3 spam.py I like to show people who is the boss.
Spaces are dealt with automatically, so you do not need quotation marks.
To exit, simply hit q while the spammer is running.
Python Introduction
Click to view Details
Getting Started with Python
Installing Python
Windows
- Go to
https://www.python.org/
- Hover over the “Downloads” button and click on “Python 3.x.x”
- Run the executeable and go through the installation wizard
Adding Python to PATH
If python wasn’t automatically added
- Navigate to “C:\Python39” if you chose “Install for All Users” or to “C:\Users\Your-Username\AppData\Local\Programs\Python\Python3x" if you chose “Install only for Current User”
- Copy the current file path
- Go to “This PC”, right click on the empty space and select “Properties”
- Click on “Advanced system settings”
- Open the “Advanced” tab (if it didn’t automatically open) and click on “Environment Variables…” at the bottom
- Under the second section “System Variables”, scroll down until you find a Variable named “Path”. Click on it and then click the “Edit” button.
- Click on “New” and paste in the file path you copied earlier
- Ok/apply and exit out of everything
To check if you correctly defined the Python system variable, fire up your favourite terminal and type the command
python --version
If you correctly defined the variable, you should get a prompt with your Python version, for instance:
#> python --version
Python 3.9.5
Linux
Fire up a terminal and type in
sudo apt update && sudo apt install python3 python3-pip -y
To check if Python got installed correctly, type in the command
python3 --version
If you correctly defined the variable, you should get a prompt with your Python version, for instance:
#> python3 --version
Python 3.9.5
Comments
In Python, single line comments can be added using #. Multi-line comments are added using triple quotation marks ‘”””’. Example:
# This is a single-line comment
"""
This is a
multi-line
comment
"""
Data Types
Python has the following data types:
- Text: Strings (consists of a list of characters, each of which is also a string on its own. Strings can be defined either with single, or with double quotes)
- Numeric types: int, float, complex
- Sequence types: list (defined using [ ]), tuples and range
- Mapping types: dictionary (defined using { })
- Set types: set, frozenset
- Booleans: bool (True/False, first letter uppercase)
- Binary types: bytes, bytearray, memoryview
Unlike other programming languages (Java/C/etc.) the type keyword of a variable does not need to be provided, and the type of a variable can change dynamically throughout a program. Example:
a = 10
print(type(a)) # int
a = 's'
print(type(a)) # string
a = [1,2,3]
print(type(a)) # list
a = b'hello world'
print(type(a)) # bytes
Type casting can be done using the corresponding method call:
a = 11.5
print(type(a)) # float
a = int(a)
print(type(a)) # int
Input/Output
Python offers its own input/output engine using the input and print methods. The input method takes in a string that is displayed before the user’s input. The print method takes in a string and prints it to the screen. (Note: special characters like backslash and single ticks will be printed as escaped out characters, e.g. “'” instead of “’”)
Example program to get a user’s name. Note the usage of ‘f’ before the string’s quotation marks, this is used to format the string and can also be done similarily to C with ‘%s’ (e.g. print('Hello %s' % (variable_name))):
text = input('Give me your name: ')
print(f'Hello {text}!')
Will yield the output:
#> python input_output.py
Give me your name: Test
Hello Test!
#>
Indentation
Unlike programming languages like Java and C, python does not use curly brackets for indentation. Instead it uses a uniform amount of spaces or tabs. These need to be uniformally used throughout the program (E.g. you can’t use tabs at one location and spaces at another and you can’t change the amount of tabs/spaces used for indentation throughout the program).
Method definitions, loops and conditionals use ‘:’ before an indented block. The following example demonstrates this.
Java code:
void someMethod(){
	// Your code
}
Equivalent python code:
def some_method():
	# Your code
Main Method
Although not necessarily required (except in a dozen scenarios, but you should know that simple scripts can be written without a main method) the “main” method in python is defined using:
if __name__ == '__main__':
	# Your code
Methods
Methods in python are defined using the def keyword. The below code gives an example of a method that takes in two variables and gives the sum of them:
def sum(a,b):
	return a + b
Methods can have a return type (which can also be dynamic! Pay close attention to your variable types!) or have none (You may also use the return keyword without a provided value).
Conditionals
Python uses the keywords if, elif and else for conditionals. The elif is a keyword for an else if scenario. Example:
if something:
	# Do something
elif something_else:
	# Do something else
else:
	# Whatever
Loops
Python uses for and while loops. The special thing is that a while loop allows an else statement at the end of it to execute some code when the loop conditional becomes false. Example:
# A simple counting loop
for _ in range(10): # _ is a wildcard, range(n) creates a list containing the elements k..n-1.
# Additional paramters define k and the stepping per iteration. By default k=0 and step=1.
	# Do something

# A simple while loop
while something:
	# Do something
else:
	# Executed when something == False
Loops also include the pass, break and continue keywords. The latter two of which work just like in any other prgramming language. pass however, works differently. pass and continue do completely different things. pass simply does nothing, while continue goes on with the next loop iteration.
The following example demonstrates this:
a = [0, 1, 2]
for element in a:
	if not element:
		pass
	print(element)

for element in a:
	if not element:
		continue
	print(element)
The outputs respectively:
0
1
2

1
2
Source: https://stackoverflow.com/a/9484008/13399409
Importing modules
Modules/Libraries may be imported using the import keyword. Example:
import requests

r = requests.get('https://www.google.com')
print(r.status_code) # returns http status code, 200 - OK, 404 - Not Found, etc.
To run the abovementioned code snippet, the library requests must be installed using pip:
Windows:
pip install requests
Linux:
pip3 install requests
To install requirements out of a file (most repos come with a requirements.txt file), use the command:
pip install -r requirements.txt
Windows Terminal/Batchfile
Windows Terminal Customization
Click to view Details
Customize Powershell to look amazing
These customizations make powershell look sick :)
Prerequisites
For the installation to run successfully, please make sure you are using Windows Terminal and are using Powershell 7 (otherwise PowerShellGet and other modules will not be installable). Also, make sure that running of Powershell scripts is enabled with Set-ExecutionPolicy RemoteSigned.
Contents
This guide offers multiple add-ons for Powershell (and Windows Terminal) in general. These are:
- Unix Toolkit (installable using Git SCM): Allows using tools like standard curl, OpenSSL and similar unix tools.
- Chocolatey as a package manager.
- Oh-My-Posh (Powershell version of
oh-my-zsh) - WSL Customization
Note that if you would like to use regular curl, you have to add the command Remove-Item Alias:curl to your PowerShell’s $PROFILE file, since it has an alias for Invoke-WebRequest in PowerShell, which does not support the native curl syntax.
Unix Tools
To use unix tools like nano/vim either install Chocolatey or install Git-SCM with the optional Unix Tools checked (latter is easier/quicker).
Chocolatey
Install the choco package manager for Windows
Set-ExecutionPolicy Bypass -Scope Process -Force; [System.Net.ServicePointManager]::SecurityProtocol = [System.Net.ServicePointManager]::SecurityProtocol -bor 3072; iex ((New-Object System.Net.WebClient).DownloadString('https://community.chocolatey.org/install.ps1'))
Fonts
The Caskaydia Cove Nerd Font allows rendering Documents, Git and other Icons within Windows Terminal. To install them, either download the Caskaydia Cove Nerd Font from here:
https://www.nerdfonts.com/font-downloads
Or click here.
Oh-My-Posh
This section describes how to install Oh-My-Posh to decorate your terminal in a fashion similar to oh-my-zsh. The available themes can be found here.
Update PowerShellGet
First of all, update PowerShellGet since it is probably outdated.
Install-Module -Name PowerShellGet -Force
Install PSReadLine
Then install PSReadLine to allow shell line customization and recoloring.
Install-Module PSReadLine -AllowPrerelease -Force
Install Posh-Git and Oh-My-Posh
Next up, install Oh-My-Posh and Posh-Git.
Install-Module posh-git -Scope CurrentUser
winget install JanDeDobbeleer.OhMyPosh -s winget
Add Theme to powershell profile
Add the following to your PowerShell’s $PROFILE file to enable Oh My Posh on terminal launch. Note that the theme (below set to aliens) can be changed to any of the ones available here by changing the name aliens to the corresponding one.
nano $PROFILE
Import-Module posh-git
oh-my-posh init pwsh --config ~/.aliens.omp.json | Invoke-Expression
Set-PoshPrompt -Theme aliens
Add File Icons and Colors
To enable file type highlighting and icons, install the following package.
Install-Module -Name Terminal-Icons -Repository PSGallery
Then add this to your PowerShell’s $PROFILE file
Import-Module -Name Terminal-Icons
Add Autocomplete
To enable autocompleting commands and command history, add the following to your PowerShell’s $PROFILE file
Import-Module PSReadLine
Set-PSReadLineOption -PredictionSource History
Set-PSReadLineOption -PredictionViewStyle ListView
Set-PSReadLineOption -EditMode Windows
Start New Windows Terminal Window in Last Location
If you would like new PowerShell instances to be launched from the folder you were lastly inside of, add the following function to your PowerShell’s $PROFILE file:
function z {
  param ([string]$newpath)
  cd $newpath
  $path = "$env:USERPROFILE\AppData\Local\Packages\Microsoft.WindowsTerminal_[YOUR_WT_VERSION]\LocalState\settings.json"
  $todir = ("$pwd") -replace "\\","\\"
   ((Get-Content -path $path)  -replace '("startingDirectory":)(.*")(.*)', ("`$1`"$todir`"`$3")) | Set-Content -Path $path
}
Now when changing directories, use the z targetDirectory/ command instead of cd targetDirectory/. Do note that if the directory gets deleted you might encounter a PowerShell launch error and need to start it in a profileless mode to change the directory.
z target_directory
Kudos to the creator of the caching function1
Powershell Profile File
The complete $PROFILE file looks like this:
Import-Module posh-git
oh-my-posh init pwsh --config ~/.aliens.omp.json | Invoke-Expression
Import-Module -Name Terminal-Icons
Import-Module PSReadLine
Set-PSReadLineOption -PredictionSource History
Set-PSReadLineOption -PredictionViewStyle ListView
Set-PSReadLineOption -EditMode Windows

$ChocolateyProfile = "$env:ChocolateyInstall\helpers\chocolateyProfile.psm1"
if (Test-Path($ChocolateyProfile)) {
  Import-Module "$ChocolateyProfile"
}

function z {
  param ([string]$newpath)
  cd $newpath
  $path = "$env:USERPROFILE\AppData\Local\Packages\Microsoft.WindowsTerminal_[YOUR_WT_VERSION]\LocalState\settings.json"
  $todir = ("$pwd") -replace "\\","\\"
   ((Get-Content -path $path)  -replace '("startingDirectory":)(.*")(.*)', ("`$1`"$todir`"`$3")) | Set-Content -Path $path
}
Windows Terminal Settings
New way (2023)
Change the Color Scheme and font used within Windows Terminal’s Settings to colorScheme - myCampbell and font face - CaskaydiaCove NF.
Old way
Add/Modify these in the settings.json File:
"colorScheme": "myCampbell",
"fontFace": "CaskaydiaCove NF",
Background
New Way (2023)
Open Windows Terminal’s settings and add the background in the designated spot.
To increase readability, change the foreground font’s color to lime or pink and enable opacity, while setting the background’s opacity to 50%. If the background does not fill the entire console, set its mode to stretch.
Old Way
To add a background to your terminal, paste it in:
%LOCALAPPDATA%\Packages\Microsoft.WindowsTerminal_[YOUR_VERSION_PATH]\RoamingState
Add this to the Windows Terminal JSON File under “default”:
"backgroundImage" : "ms-appdata:///roaming/yourimage.jpg",
"backgroundImageStretchMode" : "fill",
"useAcrylic" : true,
"acrylicOpacity" : 0.5,
Custom Commands
For advanced users who wish to make their lives easier, you can use the custom command toolkit provided by me here. These are regularily updated with increasing functionality, so it might be wise to keep them within the repository and somehow link them to your environment variables (symlinks in Windows can be created with mklink /D target/directory linkName for directories and mklink target/file/path linkName).
WSL
The bellow commands add oh-my-zsh to your WSL installation (they have to be executed in a valid WSL installation). To further customize the shell, check out this README.
wget https://github.com/JanDeDobbeleer/oh-my-posh/releases/latest/download/posh-linux-amd64 -O /usr/local/bin/oh-my-posh
chmod +x /usr/local/bin/oh-my-posh
mkdir ~/.poshthemes
wget https://github.com/JanDeDobbeleer/oh-my-posh/releases/latest/download/themes.zip -O ~/.poshthemes/themes.zip
unzip ~/.poshthemes/themes.zip -d ~/.poshthemes
chmod u+rw ~/.poshthemes/*.json
rm ~/.poshthemes/themes.zip
-
https://github.com/microsoft/terminal/issues/3158#issuecomment-817515727 ↩
Custom Windows Commands and Git Shortcuts
Click to view Details
Custom Windows Commands
This package adds multiple shotcuts/combined git commands, and some other useful commands.
To use the tools from the command line, add the current folder to your System PATH. After doing so you may use them from the command line. For example: “c” would execute the c.cmd script.
Setup
Most commands work out-of-the-box. The following commands require a file path to the scripts to be added to function:
- genpass
- hashcmp
- numconv
- oneline
- pingme
- ptransfer
- pv
- unzipall
Features
Requirements
For the python scripts to work, pyperclip and hashlib need to be installed. A requirements.txt file is available in the Scipts subdirectory. For the password vault to work, check out its page
Git Shortcuts
Note: the use of the world “params” is used to showcase that the given command can receive parameters.
In order to automate the workflow when using git, the following commands were added:
- “git add params” shortcut
a [params] - “git branch params” shortcut
b [params] - “git add –ignore-errors params all && git commit -a” shortcut
c [params] - “git checkout params” shortcut
checkout [params] - “git fetch params” shortcut
f [params] - “git diff params” shortcut
gdiff [params] - “git lgs” fancy log shortcut (see disclaimer below)
l - “git logs” shortcut
lgs - “git merge params” shortcut
m [params] - “git pull params” shortcut
git pull [params] - “git add * && git commit -a && git pull params” shortcut
pull [params] - “git add –ignore-errors * && git commit -a && git pull && git push params” shortcut
push [params] - “git remote params” shortcut
remote [params] - “git status” shortcut
s - “git stash params” shortcut
stash [params]
Etc automations
- “certutil -decode source [target]” shortcut
b64d source [target] - “certutil -encode source [target]” shortcut
b64e source [target] - LaTeX delete build files (keeps only .pdf and .tex and deletes generated build files)
clean - Python password generation on-the-fly
genpass - “netsh wlan show profile [params] key=clear” - if “params” (name of wifi network, in quotation marks if it contains spaces) is supplied, shows the wifi network’s password.
getpass [params] - Check file hash using powershell. The “algorithm” needs to be one of powershell’s supported hashes and written as follows (SHA1, SHA256, MD5, etc.)
hashcmp (provided_hash) (path/to/source_file) (algorithm) - Get public ip address
ip - Convert number from any base to any other base
numconv - Performs a “shutdown params /t 0”. “params” is the shutdown type (for instance /r for restart, /s for shutdown)
off params - Reads a file out in one line
oneline /path/to/file - Attempts to connect to an ip address on a given port
pingme - Radio player, currently supports (Requires VLC to be installed!):
- NDR 2 Radio [ndr2]
- FFN Radio [ffn]
- Rotana Radio Jordan [rotana]
play [station_name]
play stop
- Kills radio player/vlc
stop - File transfer using python
ptransfer ip_address_of_file_sender - Starts python password vault
pv - Starts serving an http server using python
serve - Unzips all zip files in the current directory
unzipall - Opens the current directory
wd - Lists network profiles
wifi
Please note:
- To use the “l.cmd” file properly, please execute (in an administrative command shell) the command included at the end of the l.cmd file. This only needs to be done once.
DISCLAIMER:
The customized git log command included in the “l.cmd” file is not made by me. All credits go to the creator: https://coderwall.com/p/euwpig/a-better-git-log
Linux/Bash
Customize Terminal with Oh-My-Zsh
Click to view Details
Setup oh my zsh
Install zsh and powerline fonts
sudo apt install zsh -y && sudo apt-get install powerline fonts-powerline -y
Clone oh my zsh
git clone https://github.com/ohmyzsh/ohmyzsh.git ~/.oh-my-zsh
Create new zsh config file
cp ~/.oh-my-zsh/templates/zshrc.zsh-template ~/.zshrc
Install powerlevel9k
git clone https://github.com/Powerlevel9k/powerlevel9k.git ~/.oh-my-zsh/custom/themes/powerlevel9k
Setup theme
nano .zshrc
ZSH_THEME="powerlevel9k/powerlevel9k"
POWERLEVEL9K_DISABLE_RPROMPT=true
POWERLEVEL9K_PROMPT_ON_NEWLINE=true
POWERLEVEL9K_MULTILINE_FIRST_PROMPT_PREFIX=""
Change default shell
chsh -s /bin/zsh
Syntax highlighting
git clone https://github.com/zsh-users/zsh-syntax-highlighting.git "$HOME/.zsh-syntax-highlighting" --depth 1 && echo "source $HOME/.zsh-syntax-highlighting/zsh-syntax-highlighting.zsh" >> "$HOME/.zshrc"
One-Liner
sudo apt install zsh -y && sudo apt-get install powerline fonts-powerline -y && git clone https://github.com/ohmyzsh/ohmyzsh.git ~/.oh-my-zsh && cp ~/.oh-my-zsh/templates/zshrc.zsh-template ~/.zshrc && git clone https://github.com/Powerlevel9k/powerlevel9k.git ~/.oh-my-zsh/custom/themes/powerlevel9k && chsh -s /bin/zsh && git clone https://github.com/zsh-users/zsh-syntax-highlighting.git "$HOME/.zsh-syntax-highlighting" --depth 1 && echo "source $HOME/.zsh-syntax-highlighting/zsh-syntax-highlighting.zsh" >> "$HOME/.zshrc" && nano .zshrc
Revert on error
chsh -s /bin/bash
Source
https://caffeinedev.medium.com/customize-your-terminal-oh-my-zsh-on-ubuntu-18-04-lts-a9b11b63f2
Change Colors
In .zshrc:
ZSH_THEME="powerlevel9k/powerlevel9k"
Clone tmux-powerline:
git clone https://github.com/erikw/tmux-powerline .tmux-powerline
Paste files .tmux.conf and .tmux.conf.local in ~/
One-Liner
sudo apt install tmux -y && git clone https://github.com/erikw/tmux-powerline .tmux-powerline
Optional Tools
In the folder “tools/” there are a couple tools included:
- A file transfer tool written in python 3,
- A script to print the content of a file in one line, useful when working with encoding/decoding
- A script that converts Windows file endings to unix ones, useful when transferring a file using the above tool from Windows to Linux
To add them, execute the following:
cd ~ && mkdir etc && echo "export PATH=$PATH:~/etc" >> .zshrc
then copy the files into the “etc/” folder.
Custom Linux/MacOS Commands
Click to view Details
Custom Linux/MacOS Commands
Here is a list of custom commands crafted as extensions for your OS’s commands. They include git shortcuts, common task shortcuts and some shortened commands.
Installation
To install and use the commands, simply download the install.sh file and execute it:
Quick Install
curl https://raw.githubusercontent.com/leolion3/Portfolio/master/Linux/CustomCommands/install.sh | /bin/bash
Manual Install
curl -O https://raw.githubusercontent.com/leolion3/Portfolio/master/Linux/CustomCommands/install.sh
chmod +x install.sh
./install.sh
The command executables will be placed under ~/.commands, which you then need to add to your shell’s rc file.
Etc
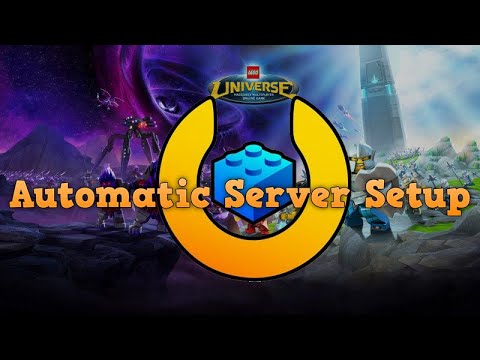
 DLU Lego Universe Server Setup
Click to view Details
How to set up a Lego Universe Server using DLU
Foreword
This guide showcases how to set up a Darkflame Universe server for Lego Universe on Linux (and the Windows Subsystem for Linux WSL)
It has been tested and deemed working ob both WSL 1 running Ubuntu 20.04, HiveOS (basically Ubuntu 18.04) and on Ubuntu 20.04 Azure and Oracle VMs.
The guide is constantly being updated to be more accurate for inexperienced users and to showcase ways of automating the setup process, as well as showcasing how to automate server maintenance and how to keep it up to date.
Youtube Tutorial
(Semi-)Automatic Installation
(*) As of recently, there is a Dockerfile available for easily building the server. To run this, download it to the folder where the res and locale directories are present, and then just execute docker build . -t lego_universe to build the image, and then run the image using
docker run -p 1001:1001/udp -p 2000:2000/udp -p 2005:2005/udp -p 3000-3300:3000-3300/udp lego_universe
The server will listen on the docker container’s ip address by default, and you will be able to access the server on localhost.
Below you can find a tool called buildserver.sh that automatically does almost all the steps in this tutorial. The only thing you need to do is download the client to the machine you wish to build the server on and supply the res folder’s location to the tool when prompted.
Note: Due to the nature of Bash, usage of ~ is not permitted. Furthermore, leave out the trailing slash and use slashes instead of backslashes. A valid res path would look like this
/home/ubuntu/client/res
Prerequisites
Install the Windows Subsystem for Linux (WSL), it is much easier than doing the stuff in native windows. Or drop Windows for the server altogether and use Linux. This might generally be a good idea as I’ve had 6 Bluesreens of Death because of memory leaks in the MySQL connector and due to accidentally misconfiguring the server’s ini files. On linux the MySQL server would crash, where on Windows it wouldn’t be able to handle MySQL crashing in WSL.
After installing wsl, launch a commandline console (Windows Terminal preferrably) and enter “wsl” and hit enter to launch the Windows Subsystem for Linux. On Linux, open a Terminal instance.
Getting the sourcecode
You can get the sourcecode from Darkflame’s Github or from my Fork
Installing git
Install git using
sudo apt install git -y
Downloading the sourcecode
To clone the repository, copy the repository link and execute
git clone https://github.com/DarkflameUniverse/DarkflameServer.git --recursive
**Note:** If you forget the "--recursive" tag then you need to initialize the submodules afterwards using
git submodule init
git submodule update --recursive
Installing Required Libraries
To compile the sourcecode you need both cmake and gcc, along with the ZLib library. Install them using
sudo apt update && sudo apt upgrade -y && sudo apt install gcc cmake zlib1g-dev -y
You might have to install build-essential and zlib aswell
sudo apt-get update
sudo apt-get install build-essential -y
sudo apt-get install zlib1g-dev -y
Setting the correct Network Protocol
Nano into the file “CMakeVariables.txt” and set “NET_VERSION” to 171022. If using a DLU Client (modded), set it to 171023.
Nano can be used by typing in “nano” followed by the file you would like to edit. To exit nano, hit CTRL+X then y and then enter to save. If you wish to discard the changes, type n instead of y when prompted.
For example, to edit the CMakeVariables.txt file type in
nano CMakeVariables.txt
Compiling the sourcecode
CD into the directory that was created and then execute the following series of commands
mkdir build
cd build
cmake ..
make
One-liner
mkdir build && cd build && sudo apt update && sudo apt upgrade -y && cmake .. && make
Setting up the database
mariaDB
- Install MariaDB
sudo apt-get install mariadb-server -y - Start the service
sudo /etc/init.d/mysql starton Linux, you can just execute
sudo service mysql startinstead.
- Login
sudo mysql -u root -pand enter the password (if you haven’t changed it, the password is also root)
-
Create a new database and name it whatever you like, in this example we're using "darkflame"
CREATE DATABASE `darkflame`; - Create a new user for the darkflame server (the server should NOT connect using the root user!)
CREATE USER 'dflame'@'localhost' IDENTIFIED BY 'dflame'; GRANT ALL PRIVILEGES ON darkflame.* TO 'dflame'@'localhost'; - Note: The user also needs access to the
dbo.UNIX_TIMESTAMPsubroutine so the WorldServer doesn’t crash whenever you load a leaderboard ingame. ExecuteGRANT EXECUTE ON PROCEDURE dbo.UNIX_TIMESTAMP TO 'dflame'@'localhost';or
GRANT EXECUTE ON PROCEDURE UNIX_TIMESTAMP TO 'dflame'@'localhost'; - You can check the available databases to make sure yours was created using
show databases; - Select the database using
use darkflame;
Creating tables
- Either execute the following while in the
build/directorymysql -u dflame -p darkflame < ../migrations/dlu/0_initial.sql mysql -u dflame -pdflame darkflame < ../migrations/dlu/1_unique_charinfo_names.sql mysql -u dflame -pdflame darkflame < ../migrations/dlu/2_reporter_id.sql mysql -u dflame -pdflame darkflame < ../migrations/dlu/3_add_performance_cost.sql mysql -u dflame -pdflame darkflame < ../migrations/dlu/4_friends_list_objectids.sql mysql -u dflame -pdflame darkflame < ../migrations/dlu/5_brick_model_sd0.sql mysql -u dflame -pdflame darkflame < ../migrations/dlu/6_property_behaviors.sql mysql -u dflame -pdflame darkflame < ../migrations/dlu/7_make_play_key_id_nullable.sql mysql -u dflame -pdflame darkflame < ../migrations/dlu/8_foreign_play_key.sql mysql -u dflame -pdflame darkflame < ../migrations/dlu/9_Update_Leaderboard_Storage.sql mysql -u dflame -pdflame darkflame < ../migrations/dlu/10_Security_updates.sql mysql -u dflame -pdflame darkflame < ../migrations/dlu/11_fix_cheat_detection_table.sql - Or create the tables from the initial.sql file manually (you can copy paste each query - or the whole big query - into the console and then hit enter)
CREATE OR REPLACE TABLE accounts (
    id INT NOT NULL AUTO_INCREMENT PRIMARY KEY,
    name VARCHAR(35) NOT NULL UNIQUE,
    password TEXT NOT NULL,
    gm_level INT UNSIGNED NOT NULL DEFAULT 0,
    locked BOOLEAN NOT NULL DEFAULT FALSE,
    banned BOOLEAN NOT NULL DEFAULT FALSE,
    play_key_id INT NOT NULL DEFAULT 0,
    created_at TIMESTAMP NOT NULL DEFAULT CURRENT_TIMESTAMP(),
    mute_expire BIGINT UNSIGNED NOT NULL DEFAULT 0
);
CREATE OR REPLACE TABLE charinfo (
    id BIGINT NOT NULL PRIMARY KEY,
    account_id INT NOT NULL REFERENCES accounts(id),
    name VARCHAR(35) NOT NULL,
    pending_name VARCHAR(35) NOT NULL,
    needs_rename BOOLEAN NOT NULL DEFAULT FALSE,
    prop_clone_id BIGINT UNSIGNED AUTO_INCREMENT UNIQUE,
    last_login BIGINT UNSIGNED NOT NULL DEFAULT 0,
    permission_map BIGINT UNSIGNED NOT NULL DEFAULT 0
);
CREATE OR REPLACE TABLE charxml (
    id BIGINT NOT NULL PRIMARY KEY REFERENCES charinfo(id),
    xml_data LONGTEXT NOT NULL
);
CREATE OR REPLACE TABLE command_log (
    id INT NOT NULL AUTO_INCREMENT PRIMARY KEY,
    character_id BIGINT NOT NULL REFERENCES charinfo(id),
    command VARCHAR(256) NOT NULL
);
CREATE OR REPLACE TABLE friends (
    player_id BIGINT NOT NULL REFERENCES charinfo(id),
    friend_id BIGINT NOT NULL REFERENCES charinfo(id),
    best_friend BOOLEAN NOT NULL DEFAULT FALSE,
    PRIMARY KEY (player_id, friend_id)
);
CREATE OR REPLACE TABLE leaderboard (
    id INT NOT NULL AUTO_INCREMENT PRIMARY KEY,
    game_id INT UNSIGNED NOT NULL DEFAULT 0,
    last_played TIMESTAMP NOT NULL DEFAULT CURRENT_TIMESTAMP(),
    character_id BIGINT NOT NULL REFERENCES charinfo(id),
    time BIGINT UNSIGNED NOT NULL,
    score BIGINT UNSIGNED NOT NULL DEFAULT 0
);
CREATE OR REPLACE TABLE mail (
    id INT NOT NULL AUTO_INCREMENT PRIMARY KEY,
    sender_id INT NOT NULL DEFAULT 0,
    sender_name VARCHAR(35) NOT NULL DEFAULT '',
    receiver_id BIGINT NOT NULL REFERENCES charinfo(id),
    receiver_name VARCHAR(35) NOT NULL,
    time_sent BIGINT UNSIGNED NOT NULL,
    subject TEXT NOT NULL,
    body TEXT NOT NULL,
    attachment_id BIGINT NOT NULL DEFAULT 0,
    attachment_lot INT NOT NULL DEFAULT 0,
    attachment_subkey BIGINT NOT NULL DEFAULT 0,
    attachment_count INT NOT NULL DEFAULT 0,
    was_read BOOLEAN NOT NULL DEFAULT FALSE
);
CREATE OR REPLACE TABLE object_id_tracker (
    last_object_id BIGINT UNSIGNED NOT NULL DEFAULT 0 PRIMARY KEY
);
CREATE OR REPLACE TABLE pet_names (
    id BIGINT NOT NULL AUTO_INCREMENT PRIMARY KEY,
    pet_name TEXT NOT NULL,
    approved INT UNSIGNED NOT NULL
);
CREATE OR REPLACE TABLE play_keys (
    id INT NOT NULL AUTO_INCREMENT PRIMARY KEY,
    key_string CHAR(19) NOT NULL UNIQUE,
    key_uses INT NOT NULL DEFAULT 1,
    created_at TIMESTAMP NOT NULL DEFAULT CURRENT_TIMESTAMP(),
    active BOOLEAN NOT NULL DEFAULT TRUE
);
CREATE OR REPLACE TABLE properties (
    id BIGINT NOT NULL PRIMARY KEY,
    owner_id BIGINT NOT NULL REFERENCES charinfo(id),
    template_id INT UNSIGNED NOT NULL,
    clone_id BIGINT UNSIGNED REFERENCES charinfo(prop_clone_id),
    name TEXT NOT NULL,
    description TEXT NOT NULL,
    rent_amount INT NOT NULL,
    rent_due BIGINT NOT NULL,
    privacy_option INT NOT NULL,
    mod_approved BOOLEAN NOT NULL DEFAULT FALSE,
    last_updated BIGINT NOT NULL,
    time_claimed BIGINT NOT NULL,
    rejection_reason TEXT NOT NULL,
    reputation BIGINT UNSIGNED NOT NULL,
    zone_id INT NOT NULL
);
CREATE OR REPLACE TABLE ugc (
    id INT NOT NULL AUTO_INCREMENT PRIMARY KEY,
    account_id INT NOT NULL REFERENCES accounts(id),
    character_id BIGINT NOT NULL REFERENCES charinfo(id),
    is_optimized BOOLEAN NOT NULL DEFAULT FALSE,
    lxfml MEDIUMBLOB NOT NULL,
    bake_ao BOOLEAN NOT NULL DEFAULT FALSE,
    filename TEXT NOT NULL DEFAULT ''
);
CREATE OR REPLACE TABLE properties_contents (
    id BIGINT NOT NULL PRIMARY KEY,
    property_id BIGINT NOT NULL REFERENCES properties(id),
    ugc_id INT NULL REFERENCES ugc(id),
    lot INT NOT NULL,
    x FLOAT NOT NULL,
    y FLOAT NOT NULL,
    z FLOAT NOT NULL,
    rx FLOAT NOT NULL,
    ry FLOAT NOT NULL,
    rz FLOAT NOT NULL,
    rw FLOAT NOT NULL
);
CREATE OR REPLACE TABLE activity_log (
    id INT NOT NULL AUTO_INCREMENT PRIMARY KEY,
    character_id BIGINT NOT NULL REFERENCES charinfo(id),
    activity INT NOT NULL,
    time BIGINT UNSIGNED NOT NULL,
    map_id INT NOT NULL
);
CREATE OR REPLACE TABLE bug_reports (
    id INT NOT NULL AUTO_INCREMENT PRIMARY KEY,
    body TEXT NOT NULL,
    client_version TEXT NOT NULL,
    other_player_id TEXT NOT NULL,
    selection TEXT NOT NULL,
    submitted TIMESTAMP NOT NULL DEFAULT CURRENT_TIMESTAMP()
);
CREATE OR REPLACE TABLE servers (
    id INT NOT NULL AUTO_INCREMENT PRIMARY KEY,
    name TEXT NOT NULL,
    ip TEXT NOT NULL,
    port INT NOT NULL,
    state INT NOT NULL,
    version INT NOT NULL DEFAULT 0
);
- Check to see that all tables were created using
SHOW TABLES;
- Exit by typing in “exit” and hitting enter
Res Folder Setup
- In the “build/” directory create a new directory called “res”
mkdir res - Copy the folders “maps”, “macros”, “BrickModels”, “names” and the file “chatplus_en_us.txt” from the “res/” folder in your client to the “res/” folder in the server’s “build/” folder
- If you want to be able to use additonal words other than the ones in the chatplus file, execute the following (while in “build/res”):
curl -O https://raw.githubusercontent.com/dwyl/english-words/master/words.txt
cat words.txt >> chatplus_en_us.txt
rm words.txt
This will add “over 466k English words” to the allowed wordlist (including cuss words, you can remove these).
- [NOTE] In earlier commits the chat didn’t work because the “chatplus_en_us.txt” had DOS line endings (\n\r) and these needed to be converted to unix ones (\n). One way to do this is using dos2unix:
sudo apt-get install dos2unix -y dos2unix chatplus_en_us.txt - [NOTE] In earlier commits unapproved pet names also had a visual bug where the background was shifted. This was also due to their DOS line endings. If you face this issue, go into the “names/” directory and execute dos2unix for every txt file in it.
- Unzip the “/resources/navmeshes.zip” file to “build/res/maps/navmeshes” (the binary files should be inside the folder navmeshes). The following command can be executed from the “build/” directory.
mkdir res/maps/navmeshes/
unzip ../resources/navmeshes.zip res/maps/navmeshes/.
[NOTE] If you missed this step you will notice as soon as stromlings start glitching through walls.
- In the build directory create a “locale” directory if it does not already exist.
mkdir locale - Copy over or create symlinks from “locale.xml” in your client’s “locale” directory to the “build/locale” directory (simlink: “ln -s path/to/client/directory/locale/locale.xml locale/locale.xml” - note that the client directory must always be accessible to the server and the location must never change, therefor copying it is recommended)
SQLite Setup
- Download this using the following command (on Windows execute the following in CMD, DO NOT execute it in Powershell as the syntax will be marked as incorrect, because “curl” in Powershell is an alias of Invoke-WebRequest. You can remove the alias using “Remove-Alias -Name curl” or in powershell 5.x+ “Remove-Item Alias:someAlias”)
curl -O https://raw.githubusercontent.com/lcdr/utils/master/utils/fdb_to_sqlite.pyand place it inside the unpacked client’s “res” folder, then execute (while in the clients unpacked “res/” folder, on Windows omit the “3” in “python3”)
python3 ./fdb_to_sqlite.py ./cdclient.fdb - Rename “cdclient.sqlite” into “CDServer.sqlite” and move it from the client’s “res/” folder into the server’s “build/res” directory. (“build/res/CDServer.sqlite”)
- Install sqlite3
sudo apt install sqlite3 -y - Execute the queries found under “migrations/cdserver” (while in “/build/res”). [NOTE] If it says that the files cannot be found, you either did not use the –recursive flag while cloning the directory or did not move the CDServer.sqlite into the right location. Please see above how to initiate the submodules after having already cloned the repository if the first point applies.
sqlite3 CDServer.sqlite < ../../migrations/cdserver/0_nt_footrace.sql
sqlite3 CDServer.sqlite < ../../migrations/cdserver/1_fix_overbuild_mission.sql
sqlite3 CDServer.sqlite < ../../migrations/cdserver/2_script_component.sql
sqlite3 CDServer.sqlite < ../../migrations/cdserver/3_plunger_gun_fix.sql
sqlite3 CDServer.sqlite < ../../migrations/cdserver/4_nt_footrace_parrot.sql
DO NOT DELETE THE cdclient.fdb FILE AS DLU NOW CHECKS FOR ITS EXISTANCE TO DETERMINE THE CLIENT VERSION. If you are updating your server to the latest version, you need to copy the file over again if you deleted it prior to the latest update (October 2022).
INI Files
- In the build folder there will now be 4 ini files (authconfig.ini, chatconfig.ini, masterconfig.ini, worldconfig.ini, sharedconfig.ini). Nano into each of them (or use whatever other text editor you use) and set the database address to 127.0.0.1 (or localhost), the username and password to the ones you set above in MariaDB and the database name to the name you set above. Example:
mysql_host=127.0.0.1
mysql_database=darkflame
mysql_username=dflame
mysql_password=dflame
Additionally, you might have to add the following line to sharedconfig.ini:
client_location=./res
If you want to run the server locally or online, you will have to also set the “external_ip” accordingly. See section “Online Multiplayer” for help setting this address.
Validate
Before running the server, make sure your “build” directory has the following structure and that no files are missing:
DarkflameServer/
├── build/
|   ├── AuthServer
|   ├── ChatServer
|   ├── MasterServer
|   ├── WorldServer
|   ├── locale/
|   │   └── locale.xml
|   ├── res/
|   |   ├── cdclient.fdb
|   |   ├── CDServer.sqlite
|   |   ├── chatplus_en_us.txt
|   |   ├── macros/
|   |   |   └── ...
|   |   ├── BrickModels/
|   |   |   └── ...
|   |   ├── maps/
|   |   |   ├── navmeshes/
|   |   |   |   └── ...
|   |   |   └── ...
|   |   └── names/
|   |       └── ...
|   ├── authconfig.ini
|   ├── chatconfig.ini
|   ├── masterconfig.ini
|   ├── worldconfig.ini
|   ├── sharedconfig.ini
|   └── ...
└── ...
Adding Admin user and running server
- While in the server’s “build” directory, execute
./MasterServer -ato add an admin
- Run the server using
sudo ./MasterServer(sudo because the port is under 1000 and either needs firewall access or sudo)
Brick-by-Brick Building
Note: it seems like this issue has been fixed and it is no longer required to do any of the following steps. If you’re still on an older server version, you should update it.
For Brick-by-Brick building, an HTTP server should be running and returning error code “404-Not Found” at all times on the client side. This can be achieved by running a python simple HTTP server in the background. To do this, execute the following command on a client’s machine:
python3 -m http.server 80 &
The HTTP server may later be terminated by bringing it back to the foreground using
fg
and then by hitting CTRL+C.
Alternatively, you can set the client’s UGCSERVERIP in the client’s boot.cfg file to leolion3.github.io/404 as shown below:
UGCSERVERIP=0:leolion3.github.io/404
Known Errors
Errors in MySQL Connector
If you receive any type of error saying there was an error with the MySQL Connector, then ensure that:
- the MySQL Service is running
sudo service mysql status -
The database was configured correctly, and the server is able to access the database you created. To test this, try to manually log into mysql using the username/password you set for the server
mysql -u dflame -pthen check to make sure the database exists
show databases;then check to make sure the tables exist
use darkflame;
show tables;
the following tables should exist:
+---------------------+
| Tables_in_darkflame |
+---------------------+
| accounts            |
| activity_log        |
| bug_reports         |
| charinfo            |
| charxml             |
| command_log         |
| friends             |
| leaderboard         |
| mail                |
| object_id_tracker   |
| pet_names           |
| play_keys           |
| properties          |
| properties_contents |
| servers             |
| ugc                 |
+---------------------+
then check to make sure the tables configured correctly by attempting to read out some of the data
select * from accounts;which should return a table containing some data (if you already created an admin), as shown below
+----+-------------+--------------------------------------------------------------+----------+--------+--------+-------------+---------------------+-------------+
| id | name        | password                                                     | gm_level | locked | banned | play_key_id | created_at          | mute_expire |
+----+-------------+--------------------------------------------------------------+----------+--------+--------+-------------+---------------------+-------------+
|  1 | TestAccount | $2a$12$N0bXz4ERLQFr9pcrhl3JtekXrj0tLFamObrkDjwi/QGMv46TRHnWm |        9 |      0 |      0 |           0 | 2021-12-05 00:00:00 |           0 |
+----+-------------+--------------------------------------------------------------+----------+--------+--------+-------------+---------------------+-------------+
Manually Updating User Data
If for some reason you need to manually update user data, you can do so by logging into mysql and updating the tables. In this example, I will showcase how to manually update a user’s password.
The user passwords are hashed using BCrypt with 12 rounds. For creating the hash and keeping things simple, I will be using an online tool.
Our reference user is going to be a user named “TestAccount” with a current password of “Test” (irrelevant) and an ID of “1” (knowing the user’s ID is key to being able to change his data in the table). My current “accounts” table looks like this (see above how to show data from a table in MySQL):
+----+-------------+--------------------------------------------------------------+----------+--------+--------+-------------+---------------------+-------------+
| id | name        | password                                                     | gm_level | locked | banned | play_key_id | created_at          | mute_expire |
+----+-------------+--------------------------------------------------------------+----------+--------+--------+-------------+---------------------+-------------+
|  1 | TestAccount | $2a$12$N0bXz4ERLQFr9pcrhl3JtekXrj0tLFamObrkDjwi/QGMv46TRHnWm |        9 |      0 |      0 |           0 | 2021-12-05 00:00:00 |           0 |
+----+-------------+--------------------------------------------------------------+----------+--------+--------+-------------+---------------------+-------------+
- First off, log into mysql using your username/password combination and then select the server’s database:
mysql -u dflame -pUSE darkflame; - Generate a new password using the online tool. My new password will be “test123” (your hash for the same password will look different because of the different salt used), with a hash value of “$2a$12$J.38IJLJLbvPwkaYsCayqef.9lsXFwyuUFiaAN0Om2XVpzMIvyHjK”.
- Update the “password” column in the “accounts” table using:
UPDATE accounts SET password='$2a$12$J.38IJLJLbvPwkaYsCayqef.9lsXFwyuUFiaAN0Om2XVpzMIvyHjK' WHERE id=1; - You should get a prompt telling you the query executed successfully
Query OK, 1 row affected (0.017 sec) Rows matched: 1 Changed: 1 Warnings: 0 - Check to see the changed data
select * from accounts;+----+-------------+--------------------------------------------------------------+----------+--------+--------+-------------+---------------------+-------------+ | id | name | password | gm_level | locked | banned | play_key_id | created_at | mute_expire | +----+-------------+--------------------------------------------------------------+----------+--------+--------+-------------+---------------------+-------------+ | 1 | TestAccount | $2a$12$J.38IJLJLbvPwkaYsCayqef.9lsXFwyuUFiaAN0Om2XVpzMIvyHjK | 9 | 0 | 0 | 0 | 2021-12-05 00:00:00 | 0 | +----+-------------+--------------------------------------------------------------+----------+--------+--------+-------------+---------------------+-------------+
Client Config
Please ensure that you and your friends change the line UGCUSE3DSERVICES=7:1, in your boot.cfg file to UGCUSE3DSERVICES=7:0,
Not doing this can result in disconnects after finishing certain missions/achievements on an attempted world switch.
Avant Gardens Survival Bug
As stated on the Darkflame Repository: “The client script for the survival minigame has a bug in it which can cause the minigame to not load.” Fox fixing this, do the following:
- open the client’s “res/scripts/ai/minigame/survival/l_zone_survival_client.lua” in a text editor. (preferably one with line count displayed)
- Navigate all the way to the bottom to line 617
- Where it says “PlayerReady(self)”, change it to “onPlayerReady(self)”
- Save the file, overwriting Read-only mode. If it cannot be edited in Notepad++, click on “Edit” and then on “Clear Read-Only Flag” and repeat the steps above.
Assembly Logo not Displayed
The Assembly Logo is not correctly displayed in some unpacked clients. The reason for this is a misconfigured path in the client’s “assembly_sign_anim_sm.kfm” file. To fix it, do the following:
- open the file “res/animations/3dui/assembly_sign_anim_sm.kfm”. Don’t worry about all the “NULL” flags, this is due to the nature of the file type.
- In Notepad++, clear the read only flag. See “Avant Gardens Survival Bug” on how to do this. In other text editors, you will have to overwrite the read-only flag when saving.
- Replace the very first readable symbol from a “9” to a “(“.
- Replace “z:lwo\4_game\client\res” by
.\..\.. - The resulting file should look like this

Connecting to the server
Based on how your server is hosted, you have to set the server’s ip address in the client’s “boot.cfg” to either of the following:
- localhost - if the server is hosted on the same machine
- The server’s IPv4 Address - if the server is hosted on the same network
- The server’s public IP Address - if the server is hosted on a different network.
To change the IP Address in the client, edit the “boot.cfg” file and set the IP Address for both the “PATCHSERVERIP” and “AUTHSERVERIP”. A valid configuration for a server on the same network (with an IPv4 Address of “192.168.1.123”) would look as shown below.
SERVERNAME=0:Your Server's Name,
PATCHSERVERIP=0:192.168.1.123,
AUTHSERVERIP=0:192.168.1.123,
[... More stuff down here ...]
Automation
Foreword
This section is NOT intended for normal server operators. While the functionalities below are indeed very useful they may be a tad too complex for normal users. You may attempt to set up some of the below functionalities for your server, but you may indeed fail.
Note: Don’t forget to enable the x-bit on the bash scripts to be able to execute them (if not using a .sh file extension) using chmod +x filename
Keeping Server Up-to-Date
Now since the server’s source code is ever changing, one wants to be able to update the server without losing the current ingame progress. To cope with this, one might want to use 2 repositories instead of 1:
- One containing the server’s source code, which is updated occasionally to include the newest features and bug fixes
- Another one containing the actual server, which is backed up to the cloud (or to a local resource) to store the users’ progress and not have to go through the entire setup process every single time the server is updated.
The way I set this up is with the following structure:
Somefolder/
└── DarkflameServer/
└── Github/
    └── DarkflameServer/
The “DarkflameServer” has the same internal structure of “Github/DarkflameServer”, however instead of actually containing the same directories and C++ source files it instead has symlinks to the files inside the “Github/DarkflameServer” directory. This allows me to independantly update the “DarkflameServer” repository without affecting the current server’s status, since the “DarkflameServer” directory is also a git repository, which is instead used for backing up the server. To skip the whole “res” folder setup, I also chose to keep the “res” folder in my own repository by removing it from the .gitignore. This means that all I have to do when updating the server’s source code is to re-run the “make” instruction and then replace the ini files with my server’s config files, where both tasks have also been automated using some bash scripts.
Note: In the following steps, whenever the “original DarkflameServer directory” is mentioned we are talking about the “DarkflameServer/” directory and not about “Github/DarkflameServer”. E.g. your own repository with your own version of the server which only contains symlinks, not the actual clone of DarkflameServer by DLU.
To do this yourself
- Create the top directory and clone a version of “DarkflameServer” into it and set it up as explained above (set up the server as you normally would). After doing so, navigate into the root of the cloned repository and delete the following directories and files:
- .git - since we are going to set up a different git repository for backing up our server. You may aswell just change the upstream URL inside the .git/config file, but this is not recommended for less experienced people.
- CMakeLists.txt
- CMakeVariables.txt
- dAuthServer
- dChatFilter
- dChatServer
- dCommon
- dDatabase
- dGame
- dMasterServer
- dNet
- dPhysics
- dScripts
- dNavigation
- dWorldServer
- dZoneManager
- migrations
- resources
- thirdparty
- vanity
- versions.txt
using:
rm -rf .git
rm CMakeLists.txt
rm CMakeVariables.txt
rm -rf dAuthServer
rm -rf dChatFilter
rm -rf dChatServer
rm -rf dCommon
rm -rf dDatabase
rm -rf dGame
rm -rf dMasterServer
rm -rf dNet
rm -rf dPhysics
rm -rf dScripts
rm -rf dNavigatiom
rm -rf dWorldServer
rm -rf dZoneManager
rm -rf migrations
rm -rf resources
rm -rf thirdparty
rm -rf vanity
rm versions.txt
- Navigate out of the “DarkflameServer” directory and create a new directory called “Github”. cd into this directory and clone the “DarkflameServer” repository again.
- Create symlinks for the previously deleted files to the newly cloned repository (execute these while in the original “DarkflameServer” directory, not the “Github/DarkflameServer” one)
ln -s ../Github/DarkflameServer/CMakeLists.txt CMakeLists.txt ln -s ../Github/DarkflameServer/CMakeVariables.txt CMakeVariables.txt ln -s ../Github/DarkflameServer/dAuthServer dAuthServer ln -s ../Github/DarkflameServer/dChatFilter dChatFilter ln -s ../Github/DarkflameServer/dChatServer dChatServer ln -s ../Github/DarkflameServer/dCommon dCommon ln -s ../Github/DarkflameServer/dDatabase dDatabase ln -s ../Github/DarkflameServer/dGame dGame ln -s ../Github/DarkflameServer/dMasterServer dMasterServer ln -s ../Github/DarkflameServer/dNet dNet ln -s ../Github/DarkflameServer/dPhysics dPhysics ln -s ../Github/DarkflameServer/dNavigation dNavigation ln -s ../Github/DarkflameServer/dScripts dScripts ln -s ../Github/DarkflameServer/dWorldServer dWorldServer ln -s ../Github/DarkflameServer/dZoneManager dZoneManager ln -s ../Github/DarkflameServer/migrations migrations ln -s ../Github/DarkflameServer/resources resources ln -s ../Github/DarkflameServer/thirdparty thirdparty ln -s ../Github/DarkflameServer/vanity vanity ln -s ../Github/DarkflameServer/versions.txt versions.txt - Create a directory called
ini_filesand cd into it - Copy over the 4 ini files you configured previously to this directory
- Create a file called
fix_ini_files:cp authconfig.ini ../build/authconfig.ini cp chatconfig.ini ../build/chatconfig.ini cp masterconfig.ini ../build/masterconfig.ini cp worldconfig.ini ../build/worldconfig.ini - Whenever you rebuild the server, simply cd into
ini_filesand execute./fix_ini_filesto copy over your configs. - Modify the “.gitignore” file inside the original “DarkflameServer” directory to include the “res/” and “locale/” directories:
!build/res/ !build/locale/ - Create a new repository somewhere (locally or on Github/Gitlab etc.) and clone it locally. Then move the .git directory from it into the original “DarkflameServer” directory. (replacing the one we deleted previously)
- You may now back-up your server independently, all the while keeping it up to date with Darkflame. (You just have to pull the “Github/DarkflameServer” repository whenever it is updated and recompile your server)
Note: Since the symlinks may break when you clone the repository to a different system, you may want to add a “fixlnks” file in the root of your repository to automate the symlink creation:
rm CMakeLists.txt
rm CMakeVariables.txt
rm dAuthServer
rm dChatFilter
rm dChatServer
rm dCommon
rm dDatabase
rm dGame
rm dMasterServer
rm dServer
rm dNet
rm dPhysics
rm dScripts
rm dWorldServer
rm dZoneManager
rm migrations
rm resources
rm thirdparty
rm vanity
rm cmake
rm versions.txt
ln -s ../Github/DarkflameServer/dServer dServer
ln -s ../Github/DarkflameServer/cmake cmake
ln -s ../Github/DarkflameServer/CMakeLists.txt CMakeLists.txt
ln -s ../Github/DarkflameServer/CMakeVariables.txt CMakeVariables.txt
ln -s ../Github/DarkflameServer/dAuthServer dAuthServer
ln -s ../Github/DarkflameServer/dChatFilter dChatFilter
ln -s ../Github/DarkflameServer/dChatServer dChatServer
ln -s ../Github/DarkflameServer/dCommon dCommon
ln -s ../Github/DarkflameServer/dDatabase dDatabase
ln -s ../Github/DarkflameServer/dGame dGame
ln -s ../Github/DarkflameServer/dMasterServer dMasterServer
ln -s ../Github/DarkflameServer/dNet dNet
ln -s ../Github/DarkflameServer/dPhysics dPhysics
ln -s ../Github/DarkflameServer/dScripts dScripts
ln -s ../Github/DarkflameServer/dWorldServer dWorldServer
ln -s ../Github/DarkflameServer/dZoneManager dZoneManager
ln -s ../Github/DarkflameServer/migrations migrations
ln -s ../Github/DarkflameServer/resources resources
ln -s ../Github/DarkflameServer/thirdparty thirdparty
ln -s ../Github/DarkflameServer/vanity vanity
ln -s ../Github/DarkflameServer/versions.txt versions.txt
Backing up and restoring server database
To back up your server’s database, you can dump it to an sql file:
sudo /etc/init.d/mysql start
mysqldump -u dflame -p darkflame > backup.sql
sudo /etc/init.d/mysql stop
The data can also be restored using:
sudo /etc/init.d/mysql start
mysql -u dflame -p darkflame < darkflame.sql
sudo /etc/init.d/mysql stop
If you have set up your own github repository for your server as shown previously, then you might want to automate the back-up process of your database. To do this, in the root of your repository “DarkflameServer/”:
- create a directory called
darkflame_databaseand another one calledfix_database. - cd into
fix_database - create a file named
export_database:rm ../darkflame_database/darkflame.sql sudo /etc/init.d/mysql start mysqldump -u dflame -p darkflame > ../darkflame_database/darkflame.sql sudo /etc/init.d/mysql stop - create a second file called
import_database:sudo /etc/init.d/mysql start mysql -u dflame -p darkflame < ../darkflame_database/darkflame.sql sudo /etc/init.d/mysql stop - To export your database you may now execute
./export_database. To import it./import_database.
Note: See the next section for how to automate the backup process further.
Note: Restoring the database without it being empty will most likely not work. To avoid conflicts in the SQL Database, drop the current one and import your backup instead.
drop database darkflame;
create database darkflame;
Note: If you would like to automate your repo backup using a Cron job while the server is running, then you have to omit the sudo /etc/init.d/mysql start and sudo /etc/init.d/mysql stop commands in the backup script (export_database).
Server run/shutdown/backup automation
To automate the server further, cd into the build directory.
- Create a file called “runserver”:
sudo service mysql start sudo ./MasterServer - Create another file called “endserver”:
cd ../fix_database ./export_database sudo service mysql stop cd .. git add . git commit -m "update database" git push - To run the server, simply execute “./runserver”. To stop it and back-up your progress, execute “./endserver”, which will automatically back up the database to an sql file and push the stuff to your repository.
Automated Backup using Cron job
Note: if you want to back up your server/database while the server is running then you have to omit the sudo /etc/init.d/mysql start and sudo /etc/init.d/mysql stop in export_database and endserver scripts
- Create a new cron job using
crontab -e - Scroll all the way to the bottom and add a new cron job (The syntax for the first 2 parameters is MM HH, e.g. at what time the job should run. I will set mine to run at 1 am every night). Note that you have to first cd into your server’s “build/” directory to be able to execute the backup script, so you need to chain the execution command to a cd command. ```
- 1 * * * cd /path/to/DarkflameServer/build && ./endserver ```
- Exit crontab by pressing ESC and then hitting 0
Multiplayer
To set up the server for multiplayer you need to change the “external_ip” in the masterserver’s ini file and the IP Addresses in the client’s boot config file (set the client’s ip address to whatever you set the server’s address in the steps below).
LAN Multiplayer
To play on LAN you need to set the “external_ip” to your local IPv4 address. To get it on windows, execute
ipconfig
and copy the value beside “IPv4 Address”
To get it on Linux, execute
ip route get 1.2
- If you don’t have “ip”, use the legacy “ifconfig” command
ifconfig
Online Multiplayer
To create an online multiplayer the “external_ip” needs to be set to your Public IP Address. You can get this by executing
curl https://api.ipify.org
in Linux or on Windows in CMD (Powershell has an Alias that sets Curl to use Invoke-WebRequest, which returns the data inside the Content variable, so in powershell you would have to execute (curl https://api.ipify.org).Content to get the ip address)
- Alternatively you can go to a website like “https://www.whatismyip.com/” or similar to get your public IP Address
Firewall rules and port forwarding
For using online multiplayer you need your firewall to allow access as well as your router to forward the ports to your local machine. Besides the legal limitations on running a Lego Universe online multiplayer server, I would not recommend running a server on your own machine, on your own network, while having this many ports open because of the security concerns it brings with it for inexperienced users. Proceed at your own risk.
Lego Universe requires the following ports to operate:
- Port 1001 UDP for client authentication
- Port 2000 UDP for the masterserver
- Port 2005 UDP for the chat server
- Ports 3000-3300 (start port is defined in the masterserver’s ini and set to 3000) UDP for the worlds
- Port 5000 TCP for the Account Manager
You will need to both allow access through firewall for these ports as well as forward them.
Note: If you are running advanced networking gear then make sure “L2 Isolation” is NOT enabled. If you are concerned about security, set up the server on a different virtual network and enable some firewall rules. (In Unifi, create a new Network and set it to be isolated from the rest of your networks, then set LAN In rules to Drop any traffic originating from the Network and going into one of your other networks)
Commands and Items
Commands
Notation:
- <> brackets: this value has to be set
- [] brackets: this value is optional
| Command | Functionality | GM Level |
|---|---|---|
/gmlevel <level> |
Set player’s GM level. 9 is Mythran, 0 is for normal players. | |
/gmadditem <itemID> [quantity] |
Give the player an item (or many if quantity was set) | 8 |
For more see the Darkflame Repo
Special Items
| Item | Description |
|---|---|
Objects_1727_name (Jetpack) |
1727 |
Objects_2243_name (Insta-kill hammer) |
2243 |
Publications
Trash Separation Using AI (Prototype paper)

A paper proposing a robot-arm trash separation approach, applicable on a large-scale using IoT Devices and public networks.
The paper can be found here
B-More-Human: Dynamic Cheering Reactions for humanoid Football-Robots (Bachelor Thesis)

The B-Human football robots were incapable of showing emotions during RoboCup games. This has been changed. The process of doing so required various tweaks dozens of code-fragments throughout the B-Human framework and the introduction of various new mechanisms.
The thesis can be found here
The thesis was graded with a 1.3 (an A if an A+ is the highest possible grade).
* The professors’ assessments can be provided upon request. Long live open source and free access to information!
Check out the dancing robots below!
Cyberbullying - Causes, Appearances and Prevention

Cyberbullying is one of the 21st century’s new demons, where due to technology it is easier than ever to bully someone without being within their physical vicinity.
In this homework for the “Informatik und Gesellschaft” (literally translated “IT and Society”) we dive into the topic of cyberbullying, display some of its root causes and manifestations and then describe ways of preventing it.
This publication can be found here
It was graded with a 1.3 and the assessment can be provided upon request.
If you are suffering from cyberbullying, reach out to either an adult who is close to you, or to your national cyberbullying helpline! If you know someone suffering from cyberbullying, reach out and offer help and/or contact the local authorities!
More from Me
Teespring Merch
Check out the various cool merch on my Teespring store
Check out my Google Play Apps!
(*) Note: Google has taken my old developer account offline for being “inactive”. The apps “Sharky” and “Semesterplaner” are temporarily unavailable. The “Easy File Transfer” can be downloaded from its Github link below, while the “Password Generator” needs to be built from source. The apps will be available again soon (on a different app store and maybe on Google Play again…). Self-hosted alternatives are in the works.
-
Open Source Easy File Transfer (Google Play )
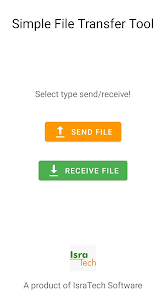
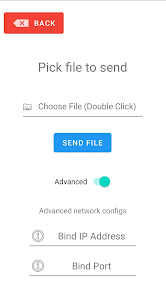

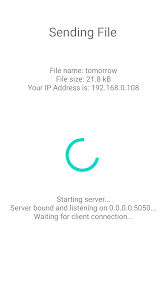
Tired of sending files back and forth through Whatsapp, just to transfer them from your PC to your Phone and vice versa? Would you like an AirDrop equivalent for Android and Windows? Well, this is it! Simply pick the file you want to send, and let the receiving device connect to your device and viola!
This is a companion app for the Python File Transfer Tool found above.
A Java graphical variant (cross-platform) can be found hereThe source code can be found on Github
Simple File Transfer Android
Back to TopSimple File Transfer Android

This app can be used to transfer files easily between two hosts on any operating system.
This app is specifally designed for Android, see below for other operating systems.
It is the companion app to the python script ptransfer
Licensed in accords with the Apache License 2.0
Author
Created and authored by Leonard Haddad.
Demo
Communication
The following illustrates the communication occurring between both clients before, during and after the file transfer.
The illustration uses the server (the client sending the file) as a viewpoint. For the client, the transfer direction is simply reversed.
--- Server --- Repeat until init signal <- PING -> REPLY --- Actual protocol <- init -> file name <- "Received Name" -> file size <- "SIZE:FILE_SIZE" or "NONEXISTANT" (determines whether the file transfer should start from scratch or resume where it was interrupted) -> "Ready for transfer!" <- "Beginning file transfer..." -> file data <- "GIVE_ME_HASH" -> FILE_HASHSimple File Transfer PC
Back to TopSimple File Transfer PC
Desktop version for the Android app Open Source Easy File Transfer.
This is a companion App for the Python script ptransfer.
For more information, as well as the network protocol used by the application, check out the source code of the Android app on Github.
Licensed in accords with the Apache License 2.0
Author
Created and authored by Leonard Haddad.
Building
To build from source, simply clone this repository and execute
mvn clean verify javafx:runThis requires a valid maven installation with at least JDK 11.
Alternatively, download the latest release from here.
Operating Systems
This App is written with cross-platform support. It runs on any operating system with Java 11.
Preview
List of available Distros:
-
 Sharky the hungry Sharkfish Game (Google Play )

Sharky is very Hungry! Help by feeding him as many fish as you can, but watch out for those nasty harpoons!
Sharky is a family-friendly game designed for all ages. Furthermore it is completely FREE
and AD-FREE. Collect coins to unlock powerups and new skins, and get that highscore!
Sharky is a great time killer for your free time as well!
Be it while waiting at the airport, or in the subway, sharky can played anywhere at any given time!
What are you still waiting for? Get Sharky today! -
 SemesterPlaner - Plan your Schedule! (Google Play )

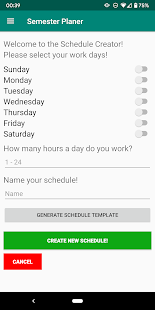
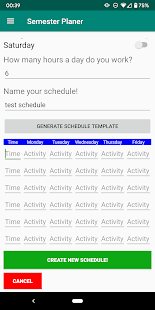
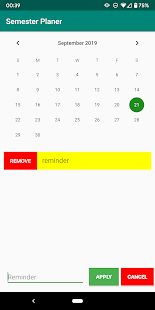
Tired of using the same old photoshop template for your semester schedule?
Why not automate your schedule creation today using Semester Planer!
Just select your work days, how long you work per day and hit that button!
Semester Planer will automatically create you a schedule table that can be filled,
edited and exported to PNG at any given time!
Stop wasting your time and use Semester Planer today! -
 Open-Source Password Generator App (Google Play )
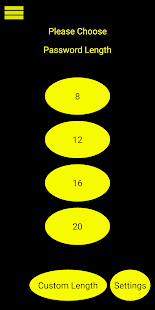

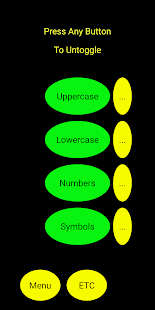
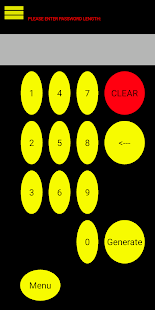
Passwords can be a real hustle, especially when you have a thousand accounts for a gazillion different websites...
There are some great password generators out there, however how can you ever really trust such a service if it is not open sourced?
Stop worrying about your passwords today, with this Free, Open-Source Password Generator!
Password Generator is completely FREE and AD-FREE, it works 100% offline an creates you a password in seconds!The source code can be found on Github


Contact
You can contact me using my email address or on Instagram @xleolion3